
# Policy
# Security Policy
FWCloud-UI allows you to create a Security Policy in a graphical, intuitive and an easy to use web user interface.
The security policy is based on IPTables, so you will expect to find INPUT, OUTPUT and FORWARD chains, as well as SNAT and DNAT. You can configure the policy for IPv4 and for IPv6.
Out of the box, your firewall will have a scaffold with a minimum set of basic rules.
Don't forget IPv6
Remember that IPv6 is now functional in the majority of Linux based and Windows systems. Some installations that seams to be quite secured have security issues when related to IPv6.
When you create a new firewall using FWCloud-UI you will have the minimum rules configured.
When you need to add a new rule, unfold the firewall group you want to add it to, unfold IPv4 or IPv6 policy group and select the appropriate chain: INPUT, OUTPUT, FORWARD, SNAT or DNAT.
On the policy panel you will see all the rules of that chain. Decide the position for the new rule. Right click on the leftmost side of the rule (that is, on the number of the rule) that occupies that position and select in the context menu Create new rule above or Create new rule below according to your criteria.
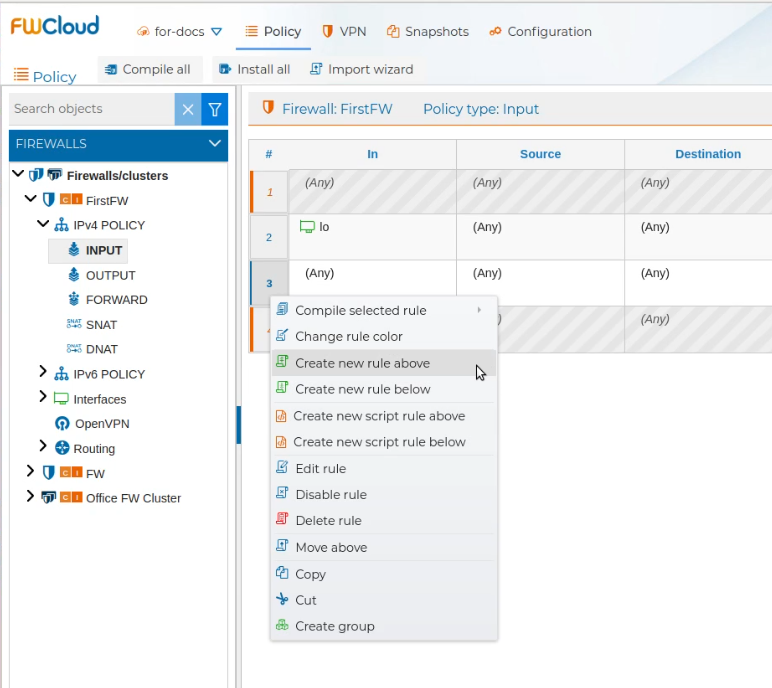
You will get a new rule added with Any value in the many of its fields.

To customize this rule according to its objective you just need to drag and drop elements on the fields. The majority of the operation in FWCloud-UI are done by drag and drop.
Copy and Paste
Sometimes is easier making copy of a previous rule and modified it than create a new one.
Just right click on the left side of the rule and select Copy. Then go to the right position, right click again an select Paste above or Paste below.
It is possible too to select and copy several rules, not only one.
When you modify the policy of a firewall, by adding or changing any rule, two new icons appear next to the firewall name.
The orange  indicates the new policy needs to be compiled, and the
  that it also needs to be installed in the target firewall.
# Policy Rules
# Rules
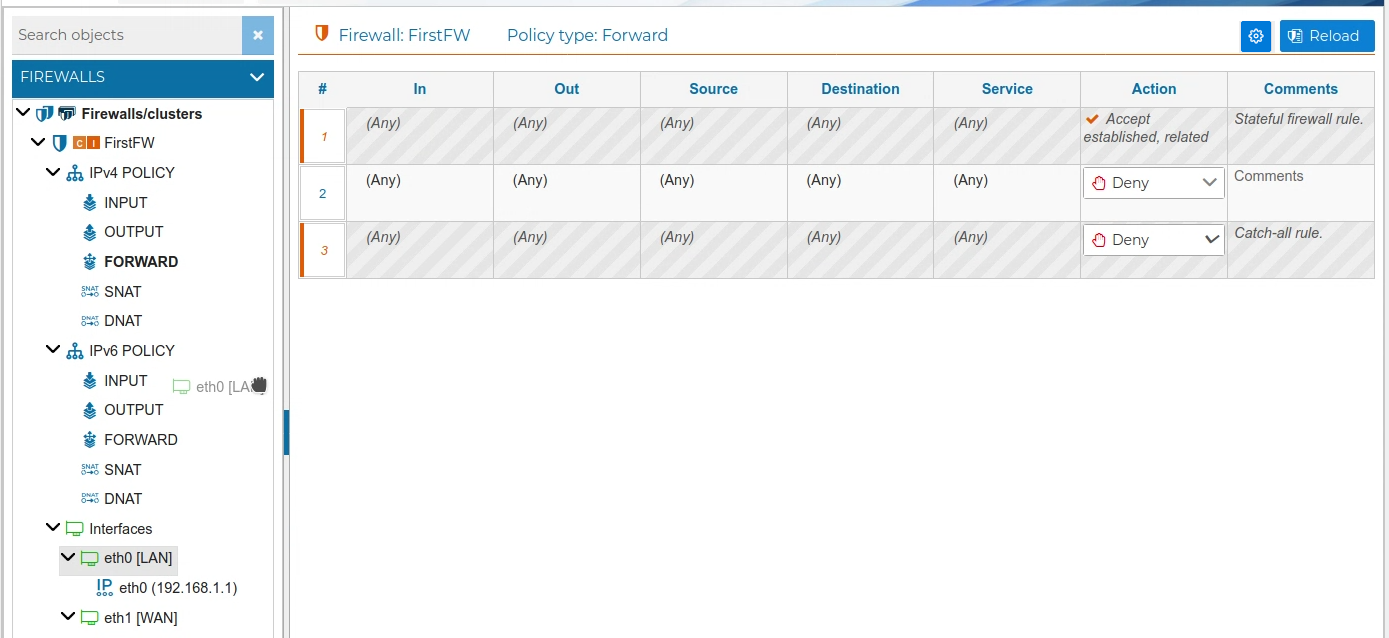
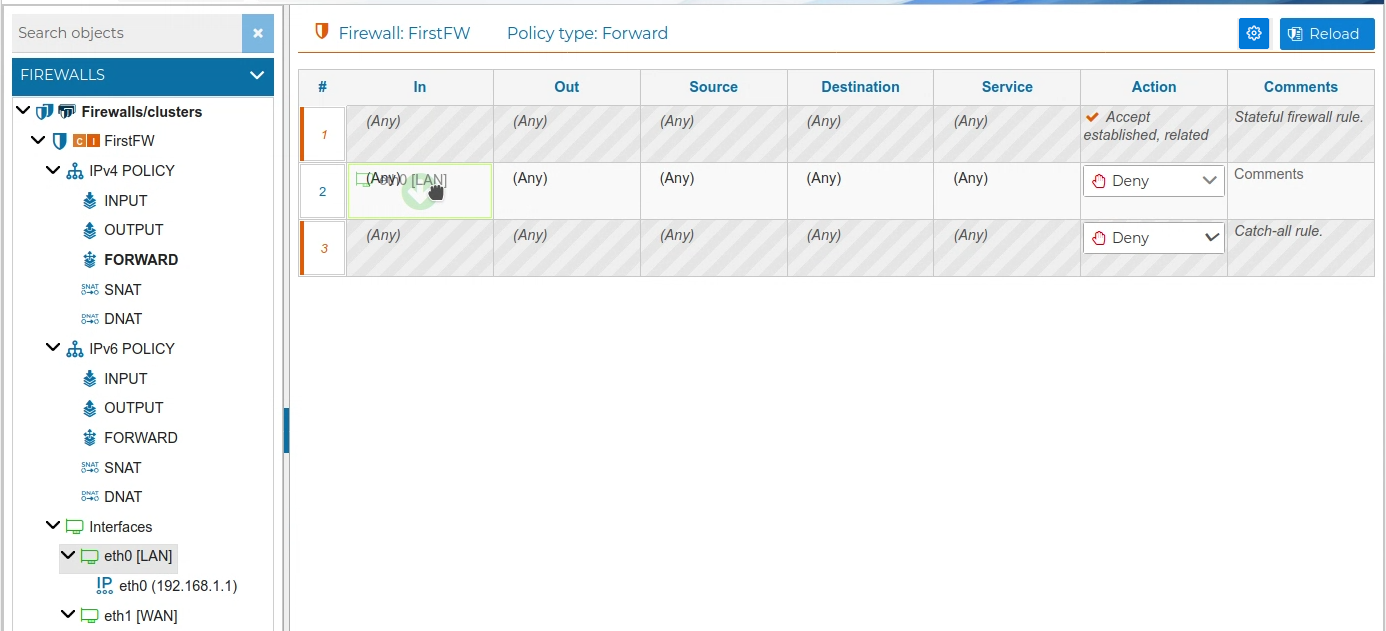
The security policy is composed of firewall rules. In FWCloud-UI any rule is graphically represented as row in a table. The columns of the table are the fields of the rule.

When you need to add a new rule, unfold the firewall group you want to add it to, unfold IPv4 or IPv6 policy group and select the appropriate chain: INPUT, OUTPUT, FORWARD, SNAT or DNAT.
Not all rules have the same fields, depending on the firewall chain you are creating the rule. FWCloud-UI only allow you to fill in the appropriate fields.
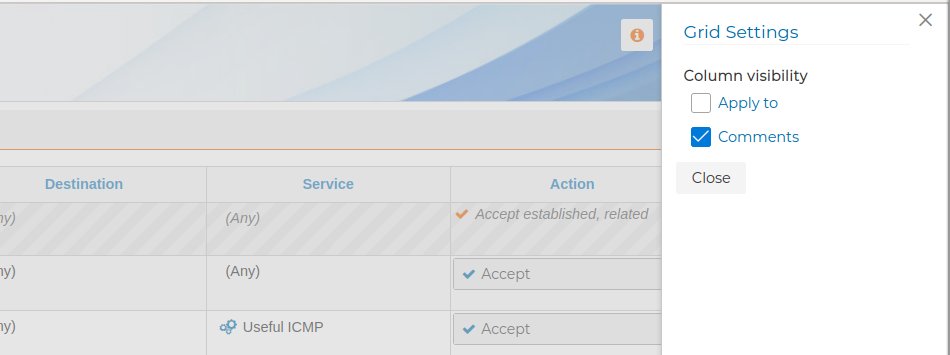
In order to focus on relevant parts of the rules you can hide same of the fields showed on the grid. By clicking on the gear icon  that is on the top of the rules table at the right,
![]()
you can access the grid settings menu and control which fields have to be displayed or not.
Some fields are mandatory an other not, like Apply to or Comments. The fields depend on the kind of rule.
On the table fields you can drag and drop interfaces, IP addresses, networks, prefix, etc. Check Objects section to know the kind of objects that can be used in a rule.
# Create new rule
In order to create a new rule go to the corresponding firewall and expand it by clicking on the > symbol. You can create rules for IPv4 and IPv6 protocols. Expand the protocol and select one of the showed chains (INPUT, OUTPUT, FORWARD, SNAT, DNAT) The Policy panel will be changed to show all the current rules of that chain. Now decide the position for the new rule. Right click on the leftmost side of the rule (that is, on the number of the rule) that occupies that position and select Create new rule above or Create new rule below according to your criteria.
You will get a new rule added with Any value in most of its fields. This is kind of template for the new rule, you will need to customize this rule according to its objectives. Now just drag and drop elements on these fields. The majority of the operation in FWCloud-UI are done by drag and drop.
# Compose rule
A FWCloud rule is composed by drag and drop elements from the left panel of the FWCloud-UI to the proper box of the rule. For instance, let's suppose you start from a fresh new rule like this:
and you want to add the interface eth0 [LAN] in the In field. Just click on eth0 [LAN], drag it ...
and drop it in the In box,
then continue with eth1 [WAN] in the Out field ...
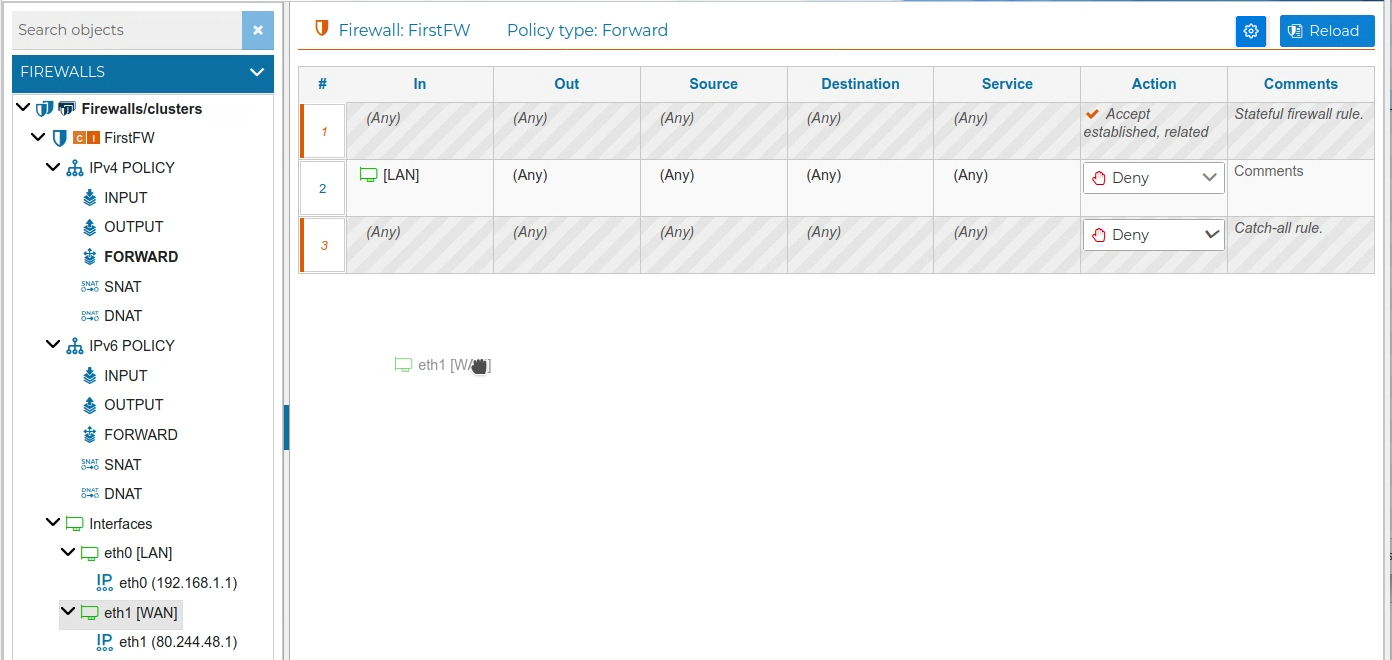
and the rest of the fields ...
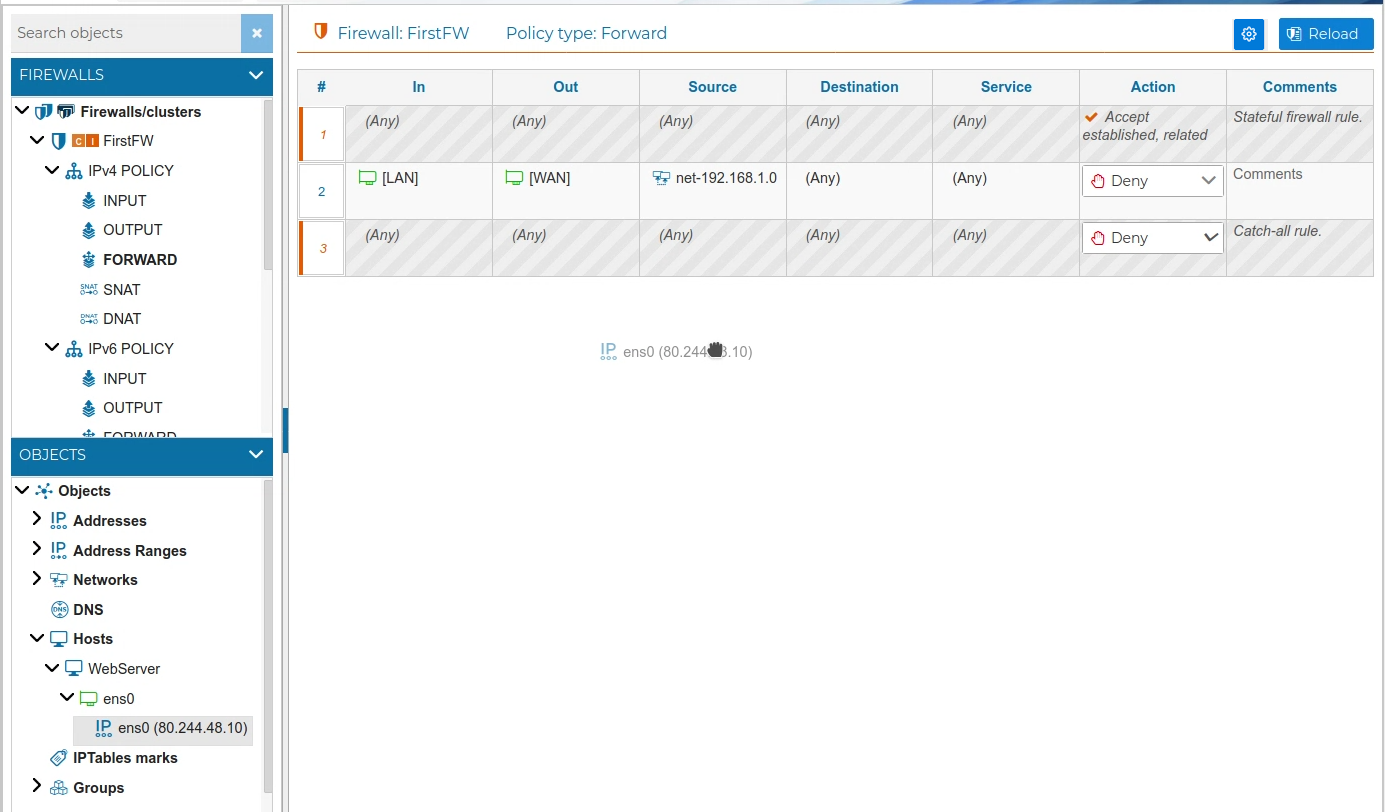
until the rule is exactly as you want it:

Important note
In order to avoid creating a rule than could lead to an incorrect policy, FWCloud-UI detects when you are adding and empty group, that is, a group with no elements in it.

# Select rules
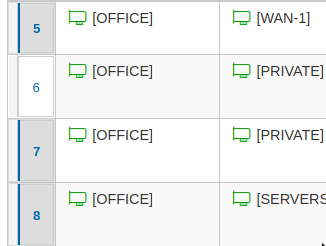
To select a rule just click on the rule number on the left. Multiple selection is possible. To select a group of contiguous rules click on the first rule and then holding the shift key click on the last rule of the range. To select a group of rules individually hold the control key when selecting the rules. Rules selected have a gray background color on the number of the rule.
In the next figure, rules with id 5, 7 and 8 are selected, while rule 6 is not
# Edit rule
Some rules can need options that cannot be accomplished by drag and drop. In these cases right click the number of the rule and select Edit rule or just double click on the number of the rule

Editing a rule allow you to modify its properties
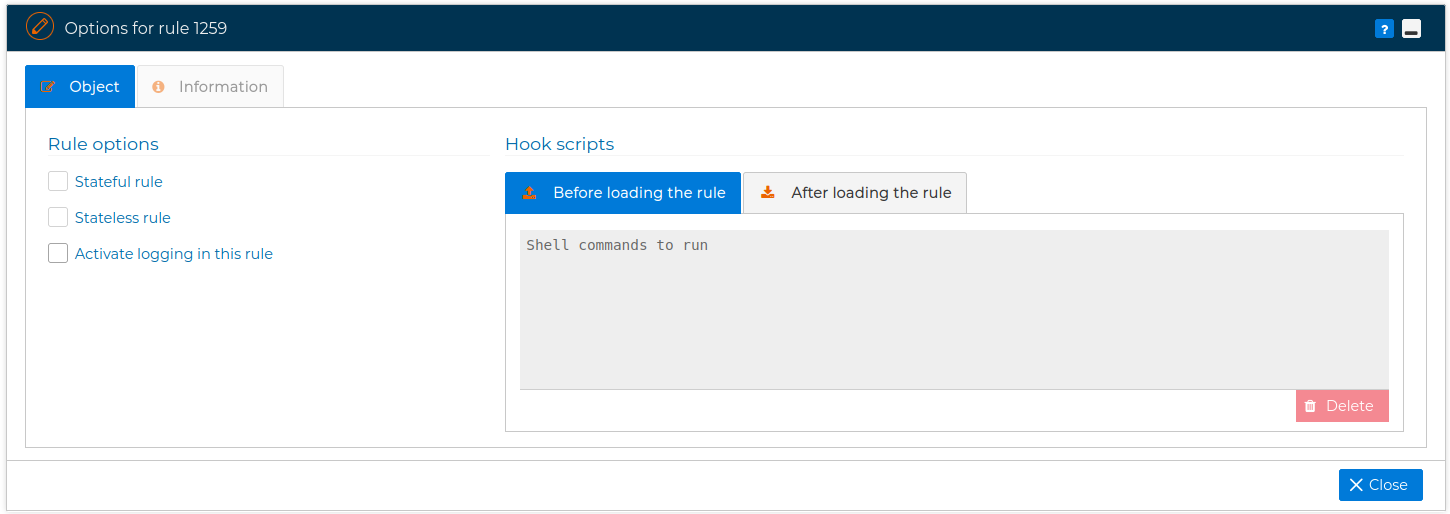
Here you can set if an individual rule takes into account the state of the connections with matching the packets or not. FWCLoud-UI configures all rules as stateful if the "Stateful firewall" is set on the firewall options (this is the default), otherwise the rules are stateless.
Also can be activated the log of the packets that are matched by this rule. The output of the log is registered in syslog prefixed by the rule number. When the log is set, a rate limit of 60/minute is applied to the rule.
When the options of a rule are modified a small gear icon ![]() appears by the rule number.
appears by the rule number.
# Rule scripts
We can make the policy rules to launch scripts. We call them "Hook scripts". They can be executed before or/and after the rule is loaded into the firewall. To associate them to a rule we just need to edit the rule an write the commands we want to be invoked in the proper text box.
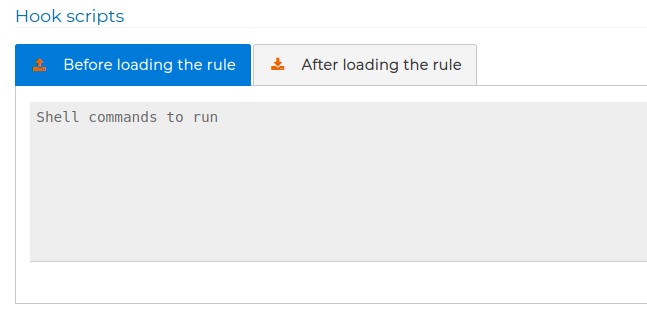
Here we can put any shell command or executable file. These text fields are limited to 65000 characters, for more structured scripts it is better to write them in a separate file. The commands detailed here will be executed by the user employed to load the policy.
This feature is very important to be able to employ FWCloud in conjunction with other programs that also modify the system secure policy. For example we can make fail2ban ban an IP address right before loading a particular rule that allows ssh traffic, just adding "/usr/bin/fail2ban set sshd banip 23.34.45.56" in that rule.
If we want to load a bunch of iptables rules before the FWCloud policy we can write them in a script file and associate it to the Before-hook-script of the first rule of FWCloud.
We have to take into account that when the security policy is loaded, all the previous security rules are replaced by the new ones detailed in FWCloud-UI.
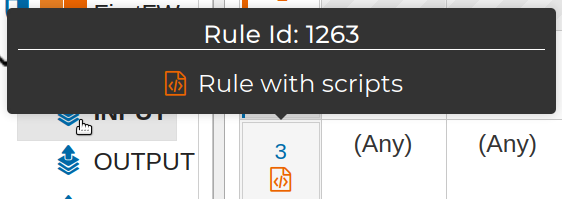
When a rule has associated scripts, it is graphically represented by an ![]() icon next to the rule number. Also if we hover the mouse over this icon we a pop up messages show us this rules has scripts.
icon next to the rule number. Also if we hover the mouse over this icon we a pop up messages show us this rules has scripts.
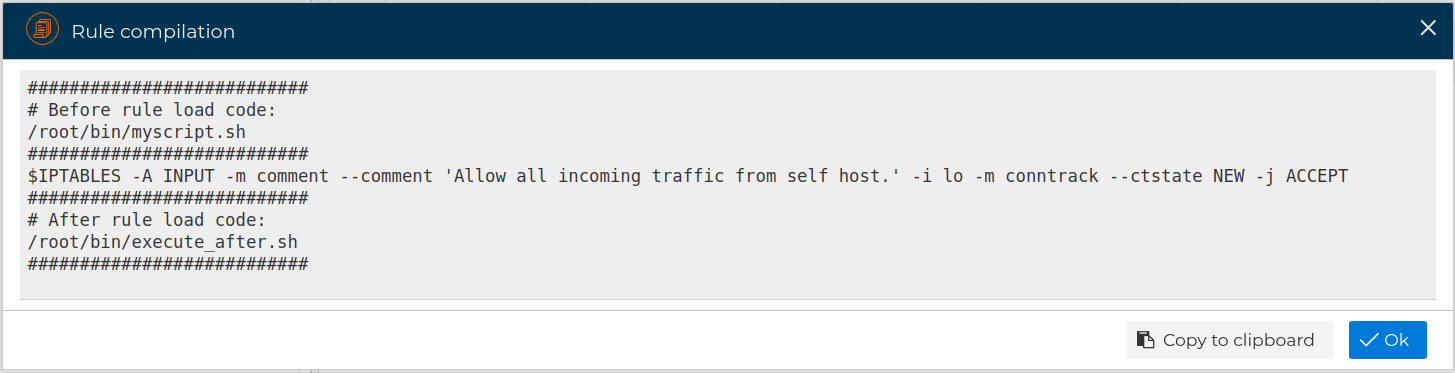
The scripts are also shown when we compile the rule. Next there is an example of a rule executing two scripts:
You can watch the next video to see a small demo about hook scripts:
# Hook script rule
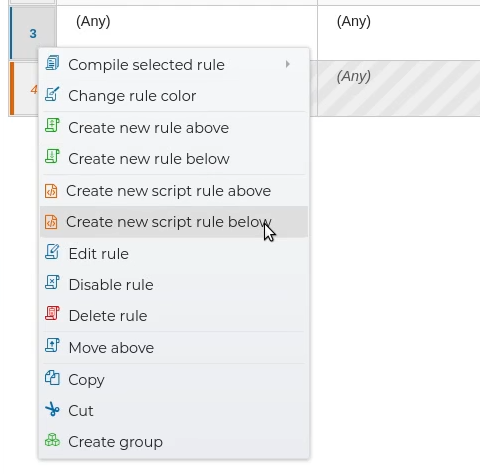
To give a more visual approach, it also possible to create script rules. We write the script code directly on the rule itself.

These are special rules that only contain the script code and optionally a comment.
They can be created in any firewall chain for both IPv4 and IPv6. For this in the menu we have 2 new options: "Create new script rule above" and "Create new script rule below"
The appearance of the rules is slightly different from the policy rules but they keep the ![]() icon to indicate that they contain a script. These rules cannot be edited by double clicking on it, since the code is entered directly. The rest of the options of the rules are maintained. We can also, for example, highlight it like any other rule by modifying its color.
icon to indicate that they contain a script. These rules cannot be edited by double clicking on it, since the code is entered directly. The rest of the options of the rules are maintained. We can also, for example, highlight it like any other rule by modifying its color.
With these rules we see exactly when the script is going to be executed and it is also not necessary to edit the rule to see the code.
This makes it easier to read the policy rules and hook scripts together.
Here there is a short video about this new rules:
# Copy rule
When composing or modifying a rule you can copy the objects from the rules you previously have and paste them in the new field.
Also for your convenience you can make a copy of a rule, right click on the number of the rule, select Copy and then right click the number of another rule and select Paste above or Paste below from the context menus.
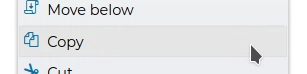
This action can be done in more than one rule if you keep them selected.
Shortcut
Rules can be copied to the clipboard using the shortcut Ctrl + C and pasted from the clipboard BELOW the last selected rule with Ctrl + V, or pasted ABOVE the first selected rule using Ctrl + Shift + V
When a rule or rules have been copied to the clipboard a small icon ![]() appears at the bottom of the policy panel. If you click on it you can see the messages indicating the number of rules copied. You can removed them from the clipboard by clicking on the litter bin icon of the message.
appears at the bottom of the policy panel. If you click on it you can see the messages indicating the number of rules copied. You can removed them from the clipboard by clicking on the litter bin icon of the message.

# Cut rule
In order to sort your rules you can cut a rule and paste on another position. This can be done by selecting Cut and then Paste above or Paste below from the context menu of the rules.
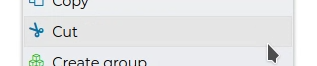
Also multiple selection of rules is allowed for this action.
Shortcut
Ctrl + X : Cut the selected rules to the clipboard
Once the rule or rules are cut you can see a ![]() red icon. If you click on it you can see the rules that are cut and pending to be copied
red icon. If you click on it you can see the rules that are cut and pending to be copied

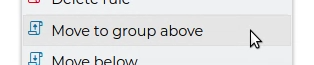
# Move rule
Rules can be moved in order to compose the secure policy. To move a rule right click on the number of the rule, select Move above or Move below until the rules gets it right place.
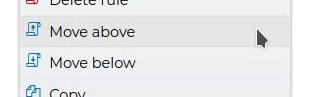
You can do it with multiple rules if the are selected.
Shortcuts
Ctrl + Up_Arrow : Move the rules above the first selected rule
Ctrl + Down_Arrow : Move the rules after the last selected rule
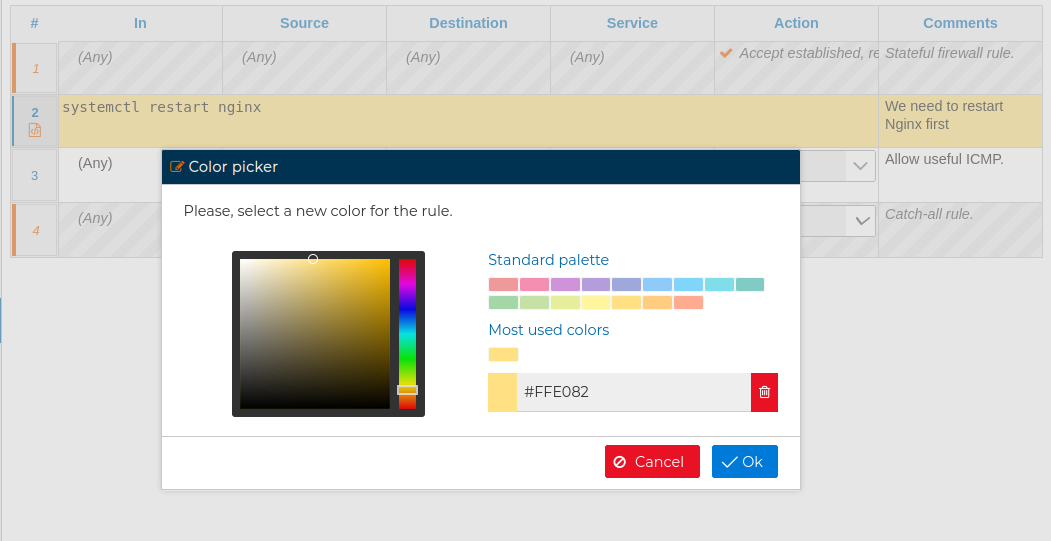
# Change rule color
To better distinguish one rules from others or which part of the policy they affect, the background color of these can be modified.
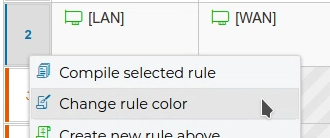
You can modify the color using the color picker form. The most used colors will be remembered in order of use, to make it easy to reuse a previous used color
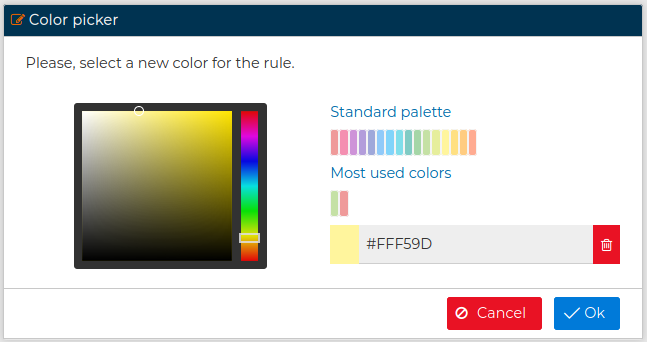
It is possible to change the color of multiple rules at the same time.
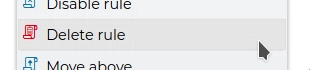
# Delete rule
If you thing a rule is not going to be needed it can be removed from the policy. Right click on the rule number and select Delete rule.
Multiple selection of rules can be done for this action.
Shortcut
Del : Asks for confirmation and deletes the selected rules
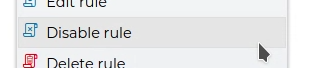
# Disable rule
Sometimes you want temporarily disable a rule but not deleted. Right click on the rule number and select Disable rule.
When a rule is disabled it is blurred and a white cross over red background appears by the rule number.

To re-enable the rule again select Enable rule in the context menu.
You can disable or enable all the rules that are selected.
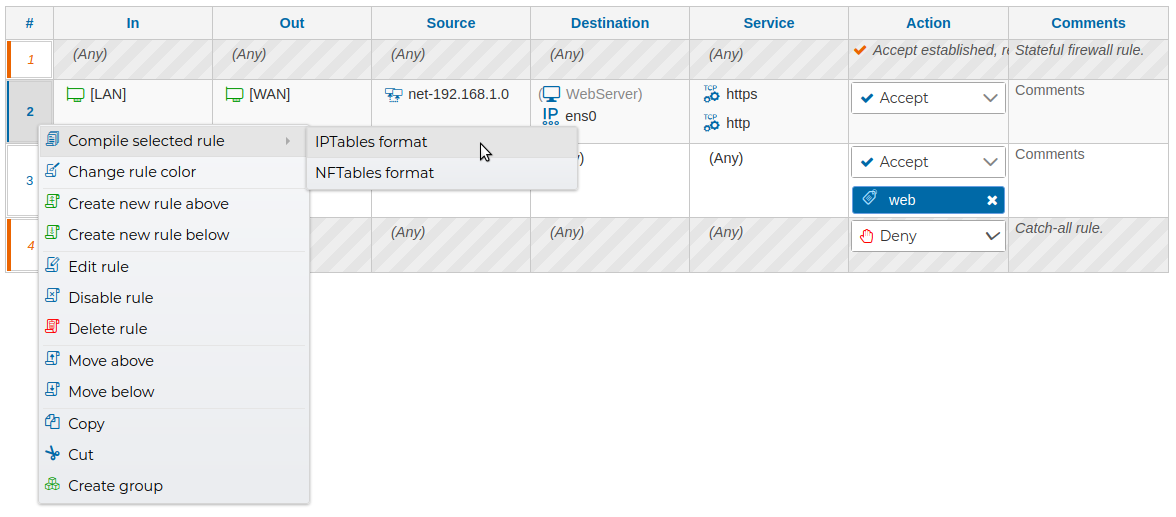
# Compile rule
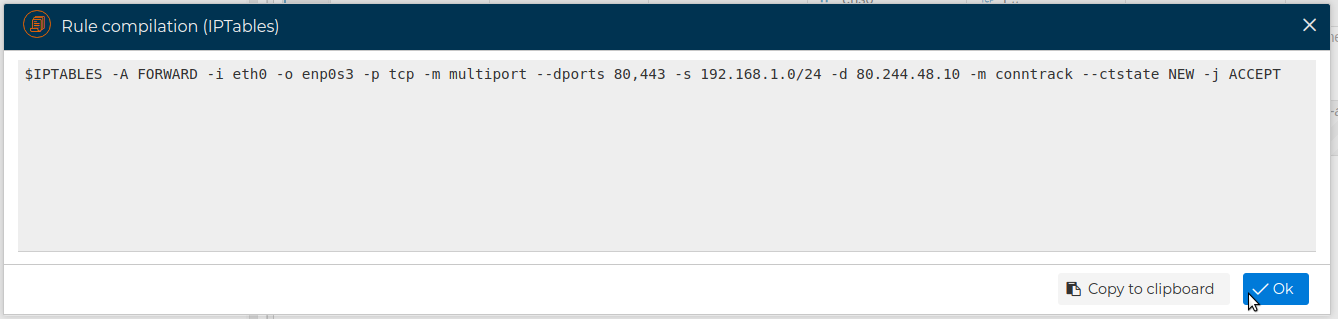
When creating your secure policy if you want to known beforehand how a rule will look like in IPTables or NFTables format when installed in your firewall, right click the number of the rule, select Compile selected rule and then IPTables format or NFTables format according to your preferences.
If you have clicked on IPTables format a pop up windows will show the rule compiled for IPTables:
or compiled for NFTables format in the other case:

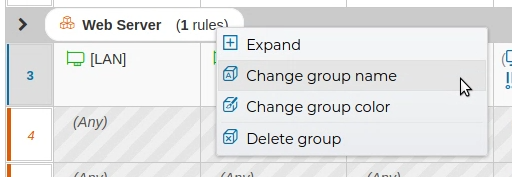
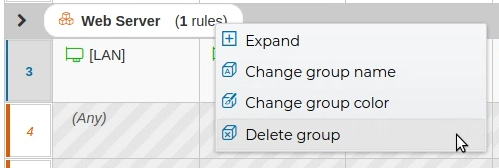
# Groups
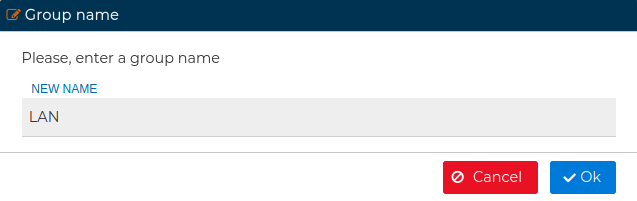
In order to organize the secure policy you can put rules into groups. First you need to create a group. A group is created from a rule than will go into it. Right click that rule and select Create group.
And fill the form with the name of the group.
By anytime you can rename a group of rules by editing it.
In order to add a rule to the group move it until is next to the group. Then right click on the rule number and select Move to the group above or Move to the group below.
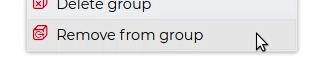
If a rule needs to be out of a group, right click and select Remove them from group.
The groups can be collapsed or expanded to the display the rules inside them. Also you can change the color of the group in order to visually separate one group from another.
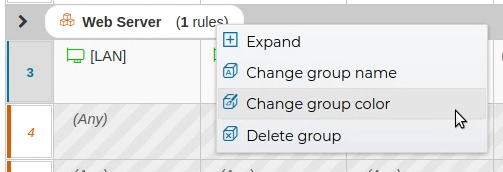

If a group is not longer needed, it can be deleted.
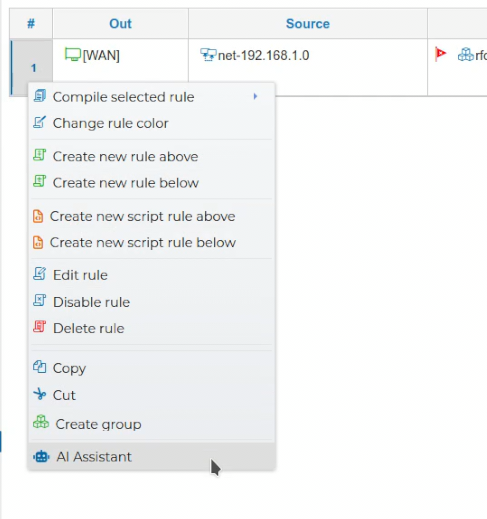
# AI Assistant
# Advantages of Using AI to Query Security Policies
The ability to ask questions to an AI system, such as ChatGPT, using security policy rules as contextual input offers significant advantages in the management and understanding of security configurations.
By analyzing the security policy as context, the AI can provide accurate and relevant explanations tailored to the specific rule set in use. This enables administrators to quickly understand the intent, scope, and impact of existing security rules without manually reviewing complex or extensive configurations.
Context-aware AI queries also improve operational efficiency. Administrators can obtain immediate answers to questions regarding rule behavior, traffic flow, potential conflicts, or policy coverage, reducing the time required for troubleshooting and audits. This is particularly valuable in environments with large or frequently changing security policies.
Another key advantage is the reduction of human error. By allowing administrators to validate assumptions or clarify rule interactions through natural language questions, the risk of misinterpreting security policies is minimized. This supports more informed decision-making when modifying or extending existing configurations.
Additionally, AI-assisted analysis enhances knowledge transfer and onboarding. Less experienced administrators can better understand security policies through guided explanations, while experienced professionals can use the AI as a reference tool to confirm complex scenarios.
Overall, the integration of AI-driven, context-aware querying capabilities provides a more accessible, efficient, and reliable approach to managing and understanding security policies.
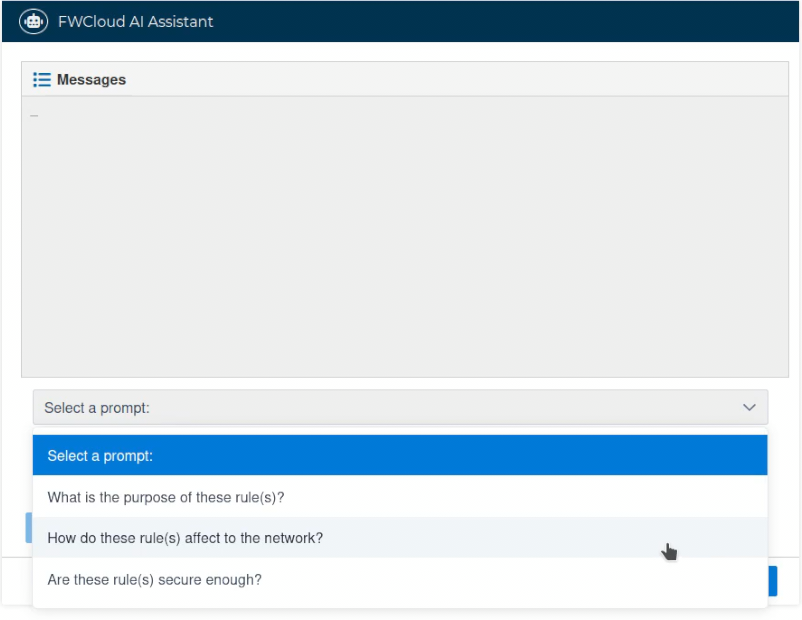
FWCloud allows users to ask questions about the selected rule, either by using preconfigured prompts, selecting them from the drop down list:
, or by creating custom prompts:
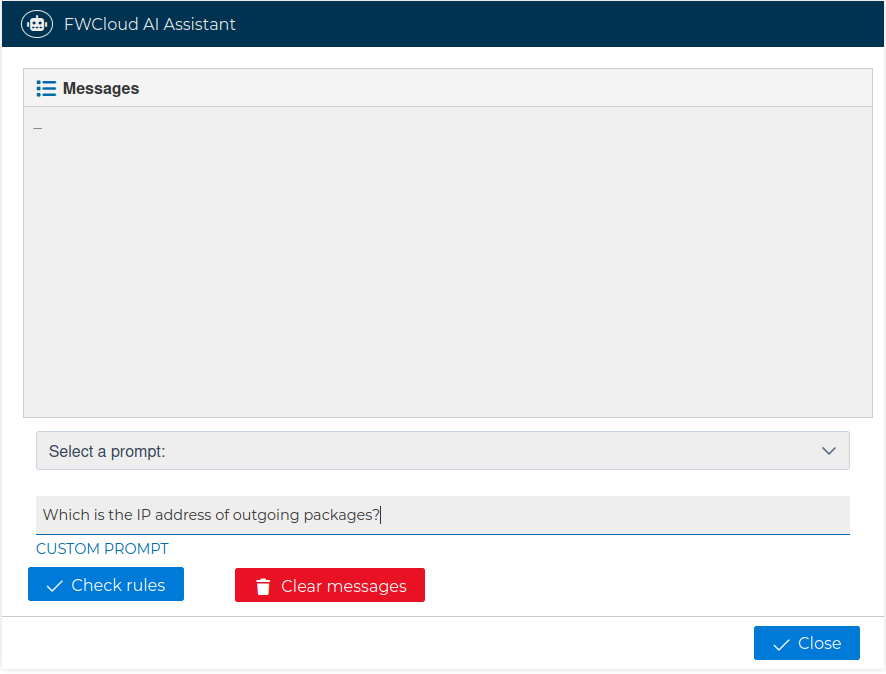
The questions and answers will appear in the Messages area after clicking on Check rules button and will be appended there until they are cleared by pressing the button Clear messages
For information about configuring AI settings visit AI assistant configuration section
# Shortcuts
After selecting one or more rules, the following keyboard shortcuts can be used:
| Shortcut | Description |
|---|---|
| Ctrl + C | Copy the rules to the clipboard |
| Ctrl + X | Cut rules to clipboard |
| Ctrl + V | Paste the rules from the clipboard BELOW the last selected rule |
| Ctrl + Shift + V | Paste the rules from the clipboard ABOVE the first selected rule |
| Del | Asks for confirmation and deletes the selected rules |
| Ctrl + Up_Arrow | Move the rules above the first selected rule |
| Ctrl + Down_Arrow | Move the rules after the last selected rule |
# Load Policy
In order to load the secure policy into a firewall you need to compile it (visit Compile firewall section) and then install it (visit Install firewall section).
The policy will take effect immediately after installed into the firewall.