
# WireGuard
WireGuard is a modern Virtual Private Network (VPN) protocol designed to provide secure and efficient encrypted communications. It is characterized by its lightweight architecture, high performance, and simplified configuration compared to traditional VPN solutions.
WireGuard uses state-of-the-art cryptographic primitives and relies on a key-based authentication model. Each peer in a WireGuard VPN is identified by a public and private key pair, which is used to establish secure tunnels and authenticate communication endpoints. This approach reduces complexity while maintaining a high level of security.
In a WireGuard deployment, VPN connections are established between peers that have been explicitly authorized to communicate with each other. Once a secure tunnel is created, all traffic exchanged between peers is encrypted, ensuring confidentiality and integrity. WireGuard operates over UDP and is designed to perform efficiently even in high-latency or unstable network environments.
Due to its simplicity, performance, and strong security guarantees, WireGuard is increasingly adopted for both remote access and site-to-site VPN scenarios. Its integration within FWCloud enables administrators to deploy and manage WireGuard-based VPN connections through a centralized and streamlined configuration interface.
# Server Configuration
To use the server certificate drag it and drop it over the name of the firewall that is going to be the VPN server.
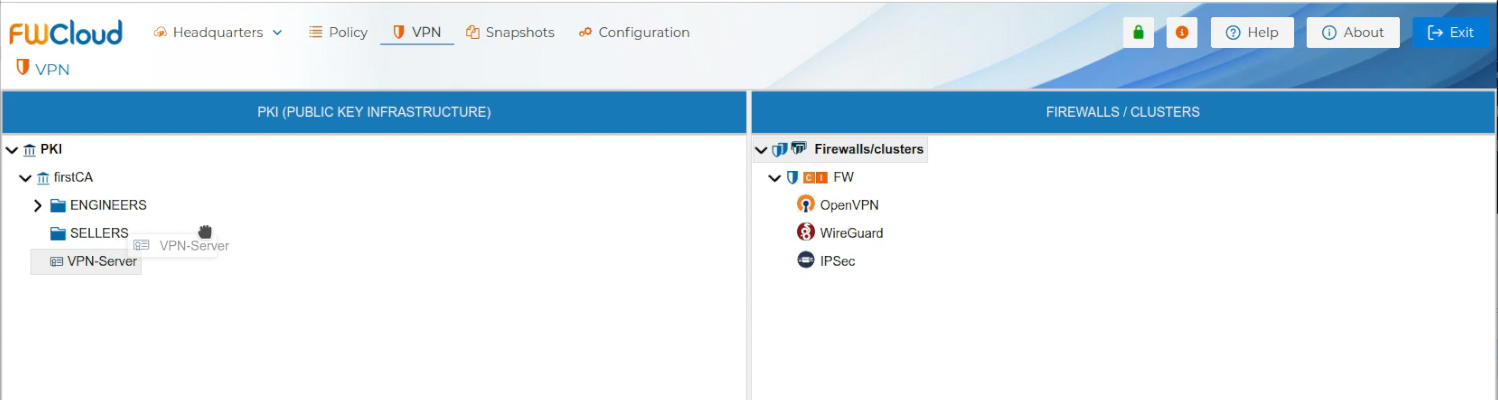
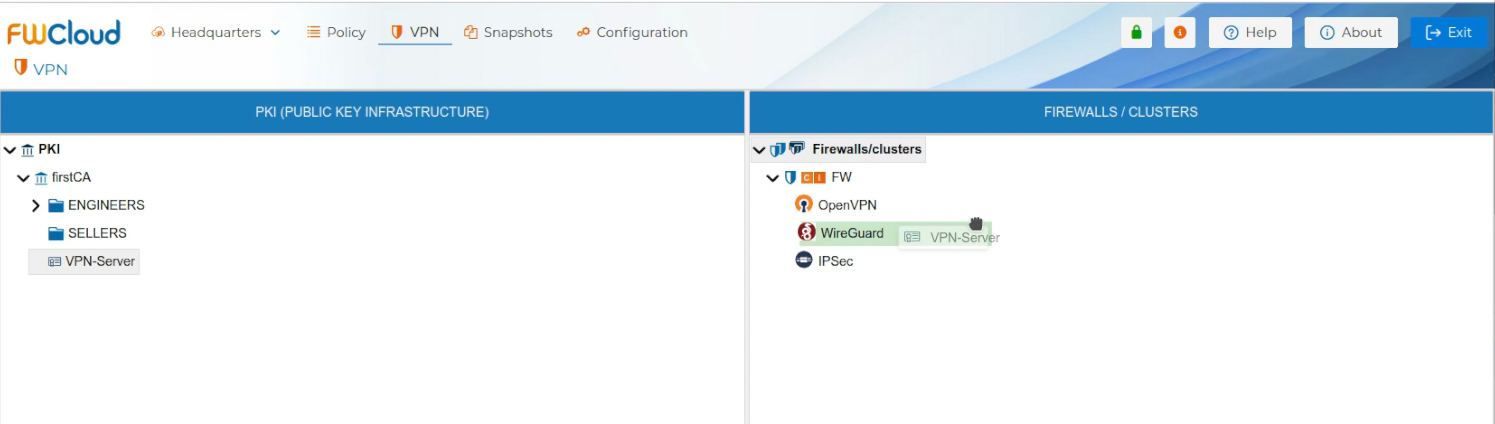
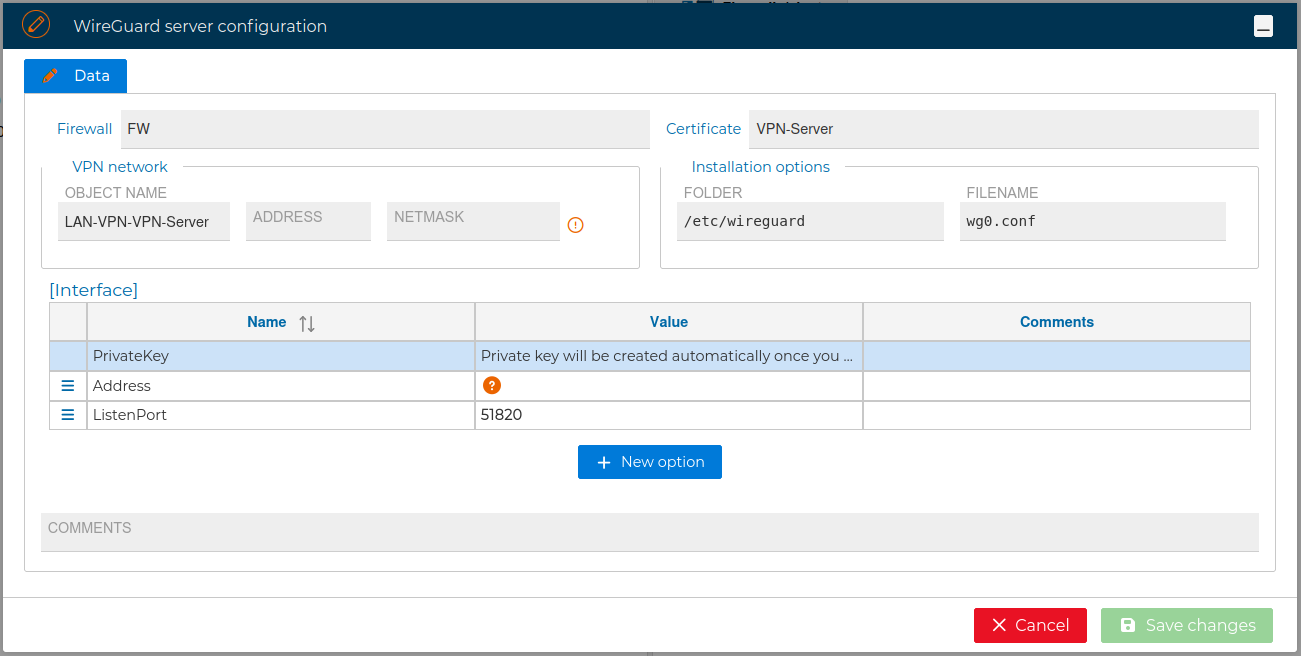
Automatically a new form is opened. You need write down the network and the mask of the network the VPN server is going to hand IP addresses from. This object is called LAN-VPN-xxxx by default, where xxxx is the name of the Sever Certificate. The name of the object can be modified if you double click the name of the Sever Certificate on the right panel or if you right click and select Edit configuration.
Although the configuration in this form is enough for the VPN Sever configuration you can modify these settings and modify, add or delete the allowed options, like the name of the file that will store this configuration or its folder or other options like verbosity level.

For reference, next are the allowed options: Address, ListenPort, PrivateKey, DNS, MTU, Table, PreUp, PostUp, PreDown, PostDown, SaveConfig, FwMark. More information about the options can be found in WireGuard options (opens new window)
# Install Sever Configuration
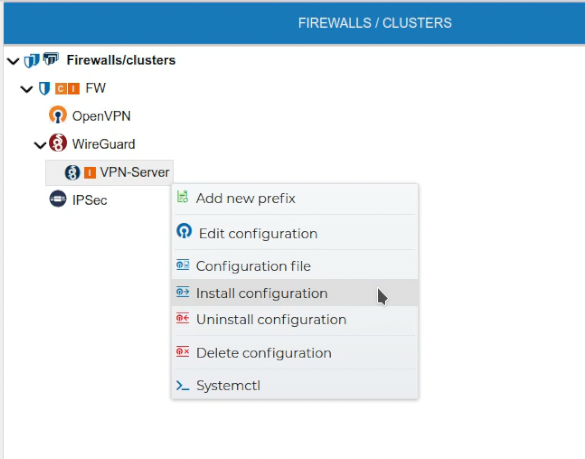
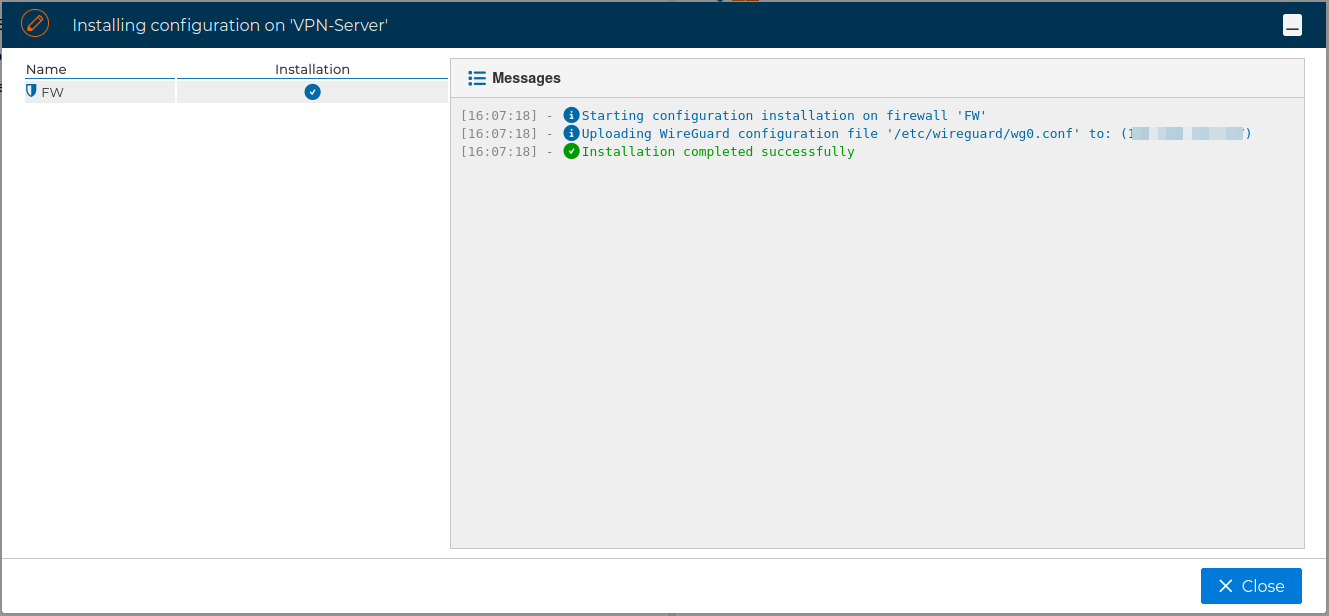
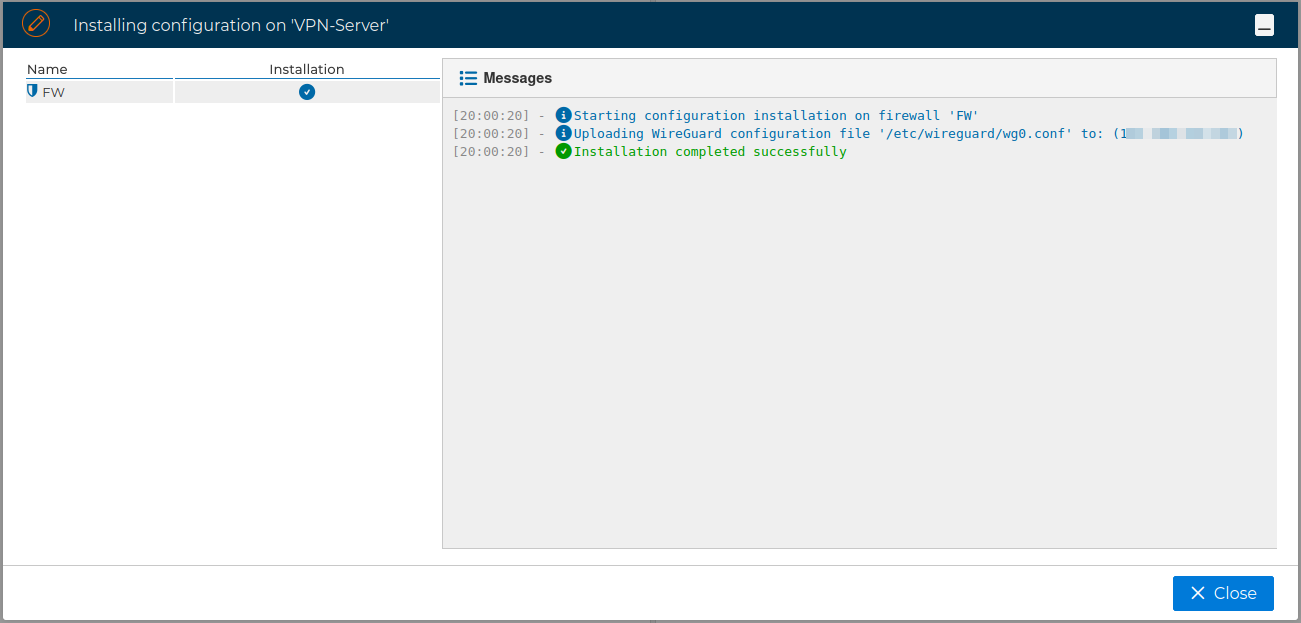
Once the VPN Server configuration is created, it needs to be installed in the firewall. Right click over the server certificate and select Install Configuration.
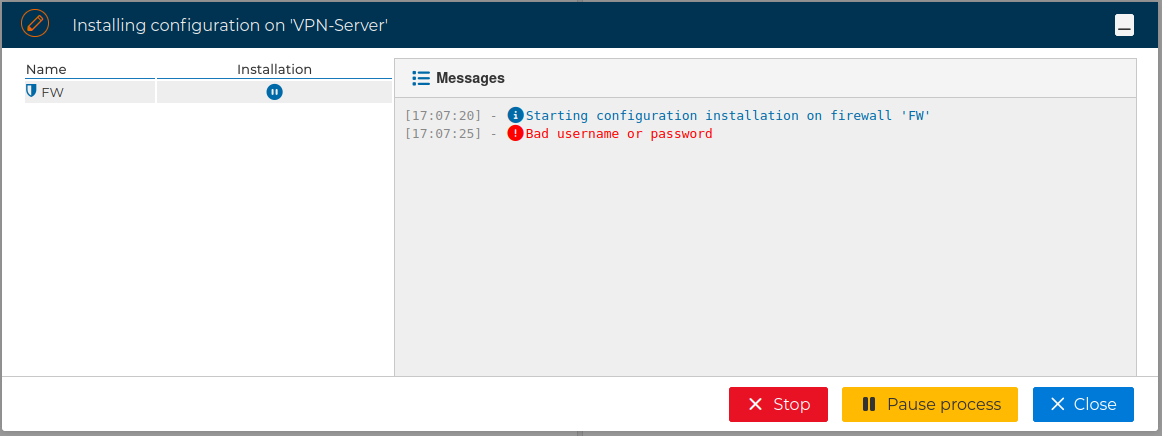
If FWCloud access the target firewall via SSH and the credentials are not configured a pop up windows will ask for them, otherwise the installation will proceed.
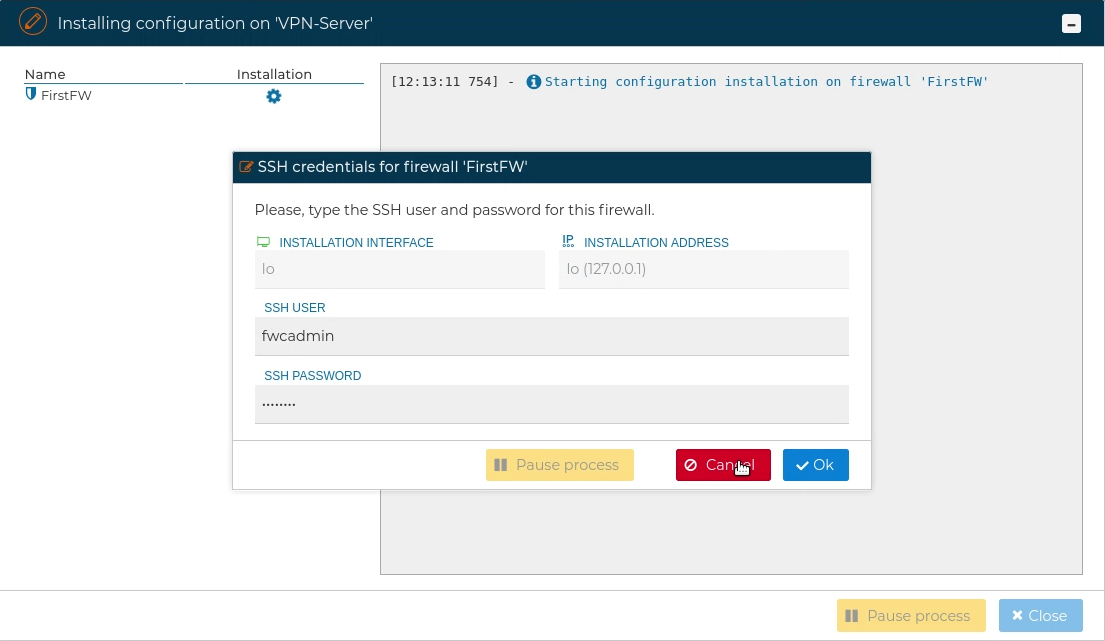
When using SSH access, the user provided also needs to be able to execute "sudo" commands, otherwise the next error will occur:
If no problems occur the VPN Server configuration will be installed on the target firewall
# Client Configuration
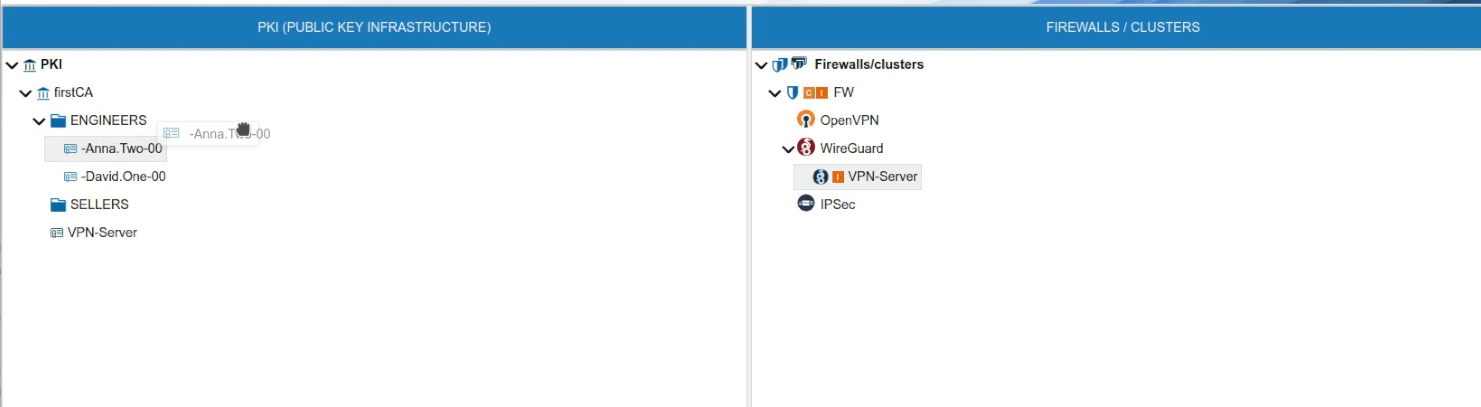
To use the client certificate drag it and drop it over the name of the VPN server. Note that the VPN server background turns green we you hover the certificate over it.
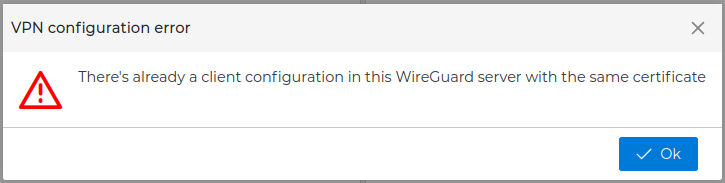
If the VPN server already has another certificate with the same name you will receive a warning and the certificate will not be moved to the server. The name of the certificates must be unique within the VPN server scope.
If this the first certificate you drop, automatically a new form is opened where you can configure the OpenVPN options for the client.
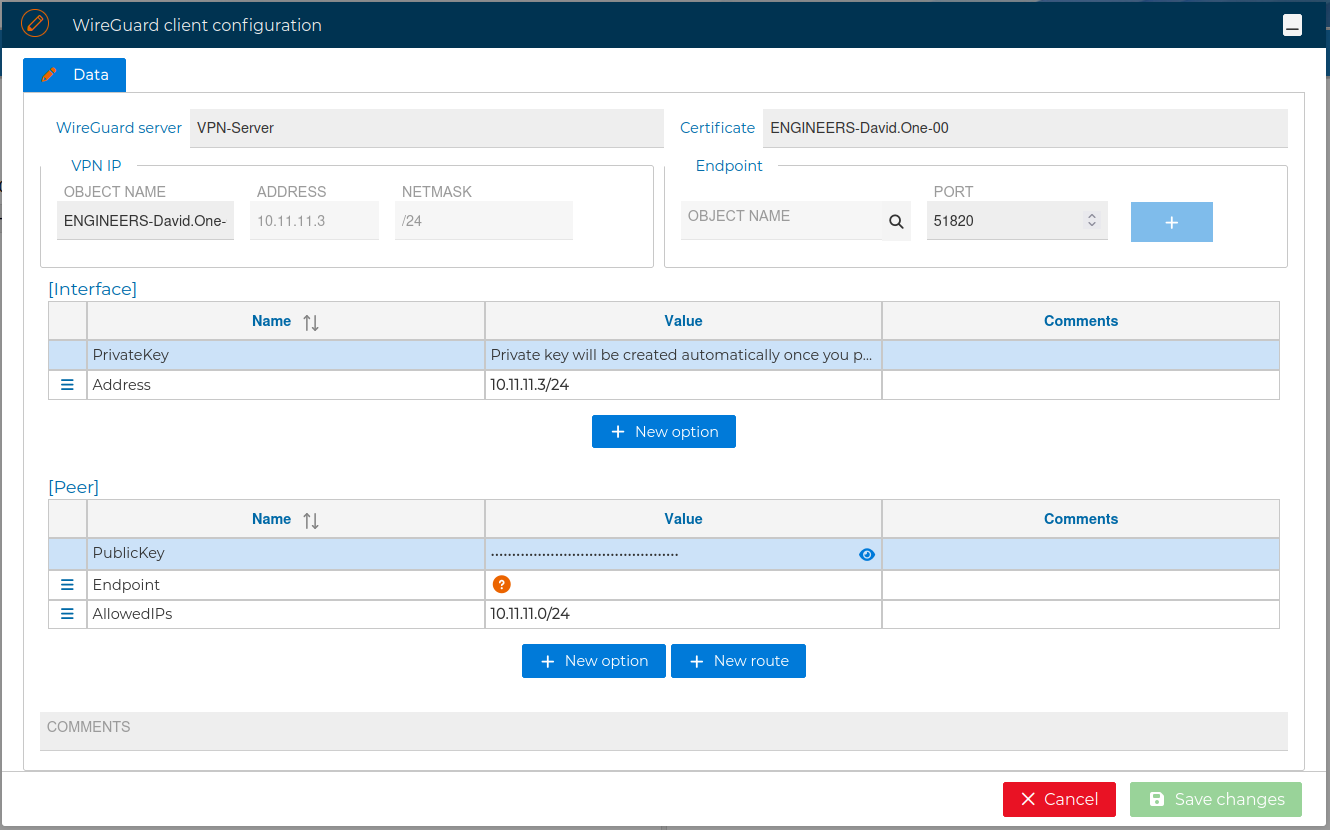
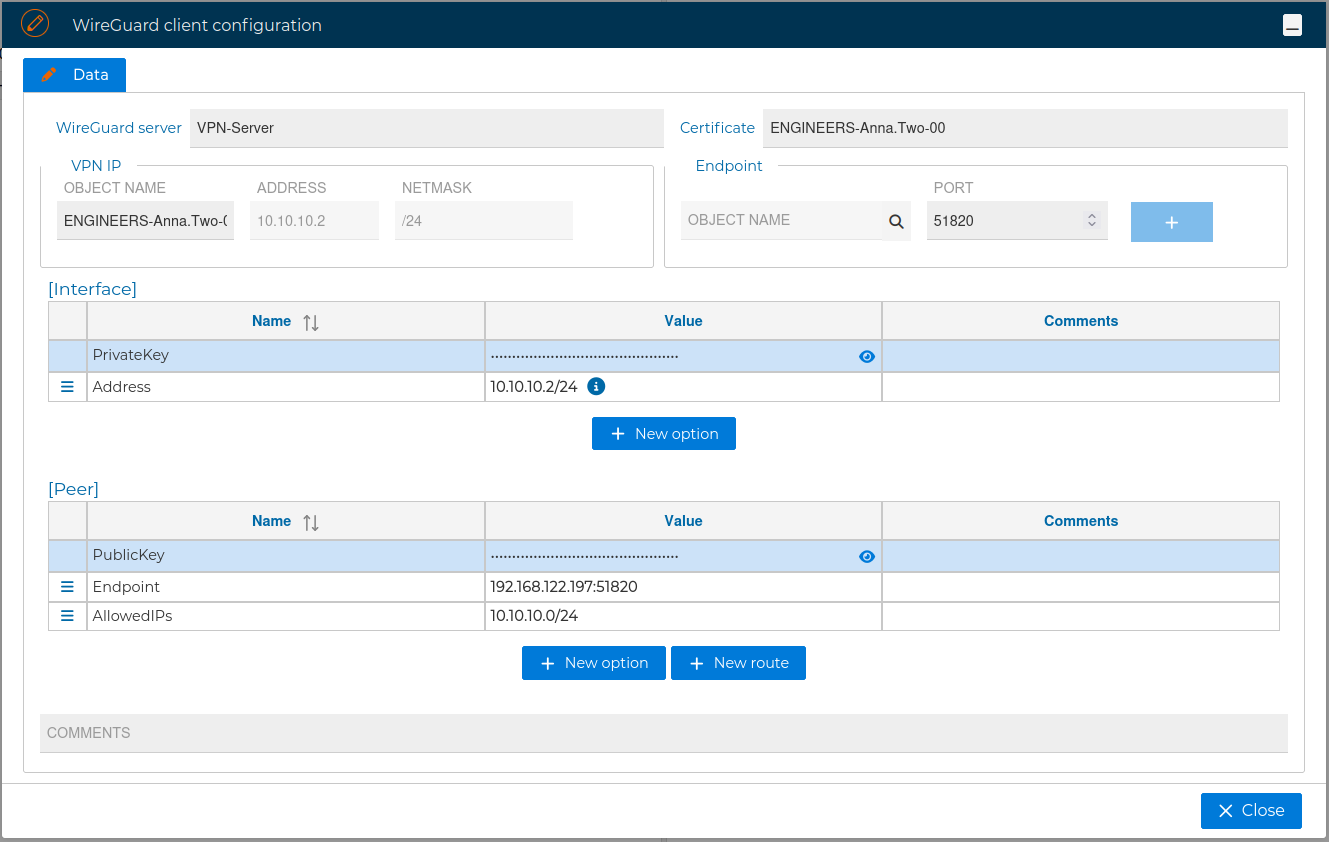
The most important option in this form you have to fill in is endpoint. It makes reference to the IP address the VPN clients connect to stablish the VPN tunnel. This is normally the public IP address you use to reach the firewall. You can write it in the Value field or use the magnifier  icon in the Remote section.

When you click that icon a new menu displays the IP addresses configured in FWCloud-UI in tree way. Select the appropriate one and click the  icon. Then modify the port if VPN server is not listening in the default one and finally click on the
 + icon next to the port number. Only one endpoint can be configured.
In the VPN client configuration form you can also add, delete or modify options like PrivateKey, Address and DNS for the interface section, or Endpoint, AllowedIPs, PublicKey, PersistentKeepalive and PreSharedKey for the Peer section.
The options available here are: push, push-reset, iroute, iroute-ipv6, ifconfig-push, ifconfig-ipv6-push, disable, config, max-routes-per-client and comp-lzo.
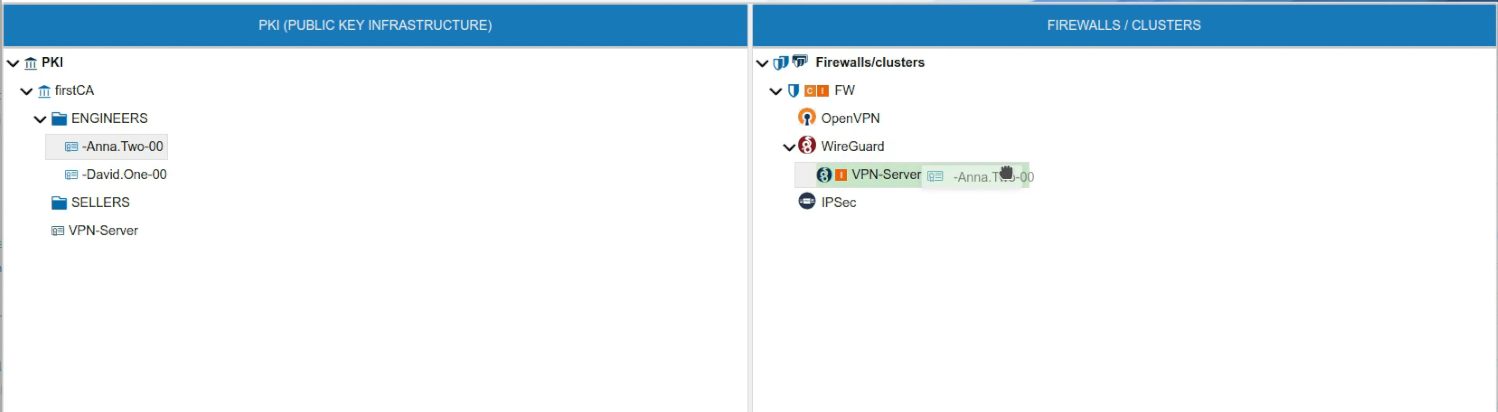
When you have the VPN client configuration ready press Save changes button in right bottom side of the form. The new client certificate appears in the FIREWALLS/CLUSTER side with an  icon by his name. This indicates this certificate is not yet installed in the firewall.
When you drop the client certificate in the VPN server, if this already have other client certificates you will be asked if you want to clone the configuration from another client VPN configuration.
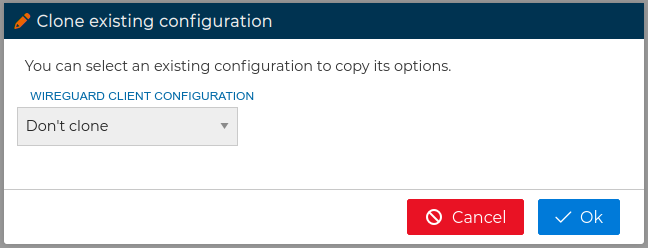
In this form you can choose from the drop down field which client configuration you want to copy its options from. When you are configuring multiple clients this save you a lot of time and avoid mistakes. After that the client configuration form will be opened.
# Install Client Configuration
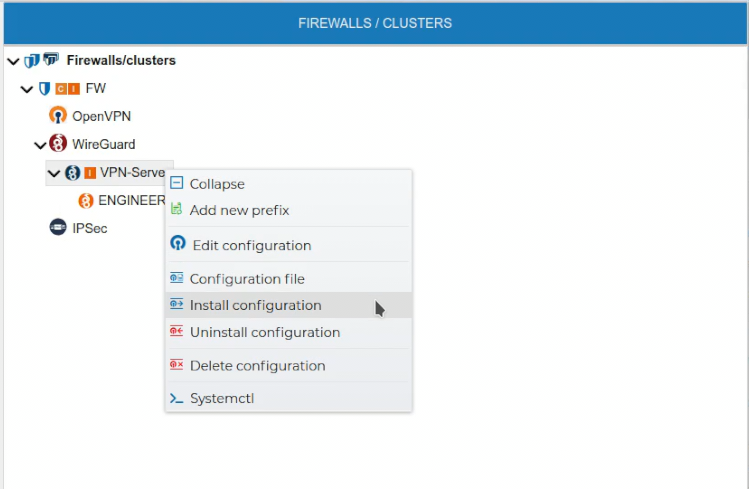
Once the VPN Client configuration is created, it needs to be installed in the firewall by updating the VPN server configuration. Note that an icon appears by the server name. Right click on the server and select Install Configuration.
When the certificate is installed in the firewall the icon is cleared.
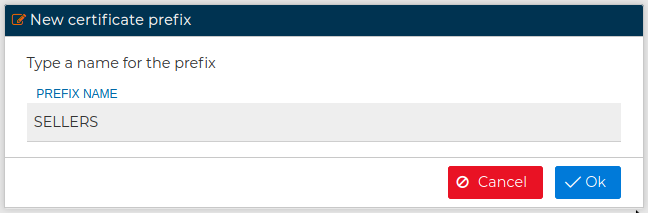
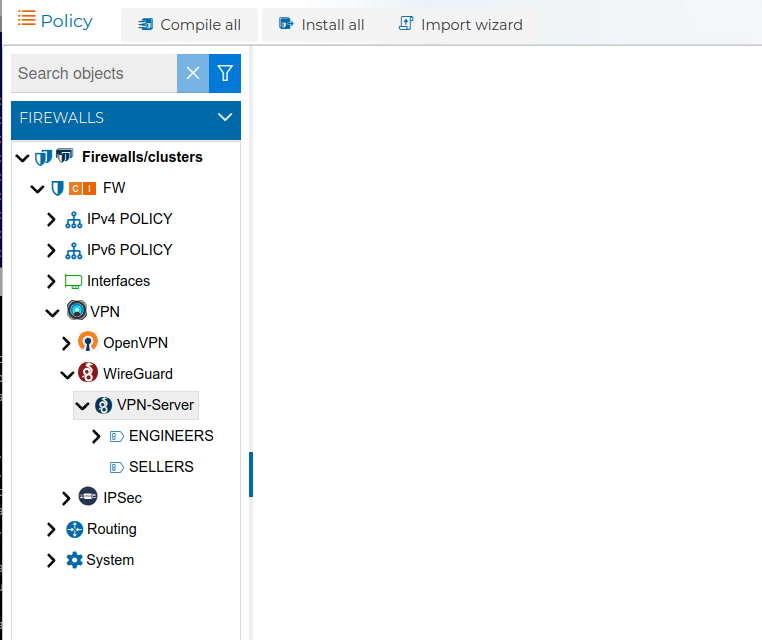
# Prefixes
Prefixes can also be created in the FIREWALL/CLUSTER section.
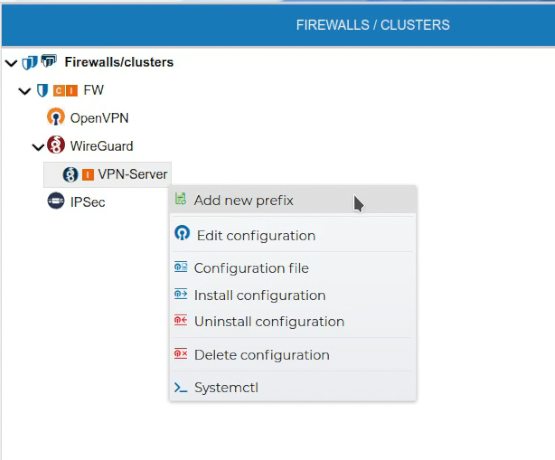
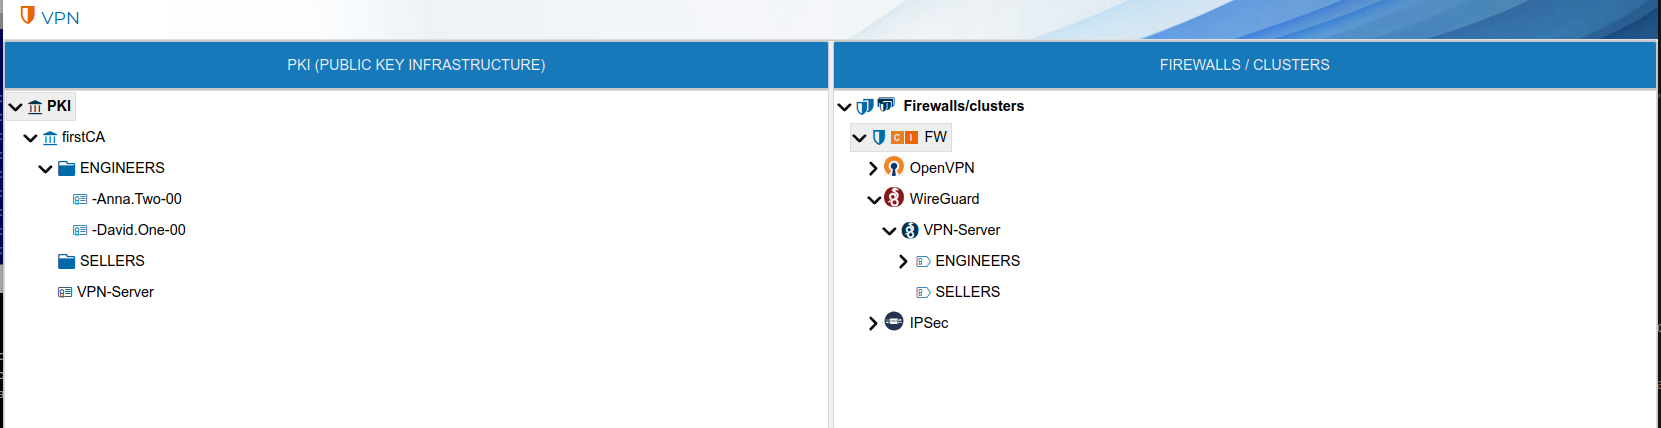
Do not confuse with PKI prefixes
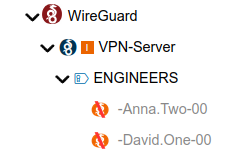
PKI prefixed are for organizational purposes only while WireGuard server prefixes can be used in the security policy.
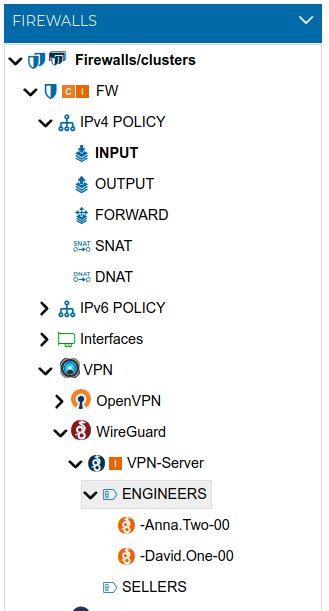
In the next figure you can see PKI prefixes on the left side are represented by ![]() while the prefixes created in the WireGuard server have a different
while the prefixes created in the WireGuard server have a different ![]() icon.
icon.
You can use the Prefix when creating the policy rules. Instead of needing to add all IP addresses of every VPN connections of any client which his certificate name starts with a common part (the prefix), you can add that Prefix in the rule. The prefix can be dragged and dropped in the rule fields. Only non empty prefixes can be dropped.

FWCloud-UI will display the prefixes in the Policy section when you expand the WireGuard branch inside the firewalls in the Firewalls group. Only VPN server prefixes will be displayed here.
Here you have an example with two rules using prefixes

In this case since we have two VPN client configurations with the prefix ENGINEERS, the rule number 10 refers to any connections established from this two VPN clients
The use of prefixes makes the security policy more clear and easy to read. Also when you create new VPN client configurations with the same prefix you do not need to modify or create new rules. Although the policy needs to be compiled and installed again, since when it was installed in the firewall it did not yet have the new clients configurations.
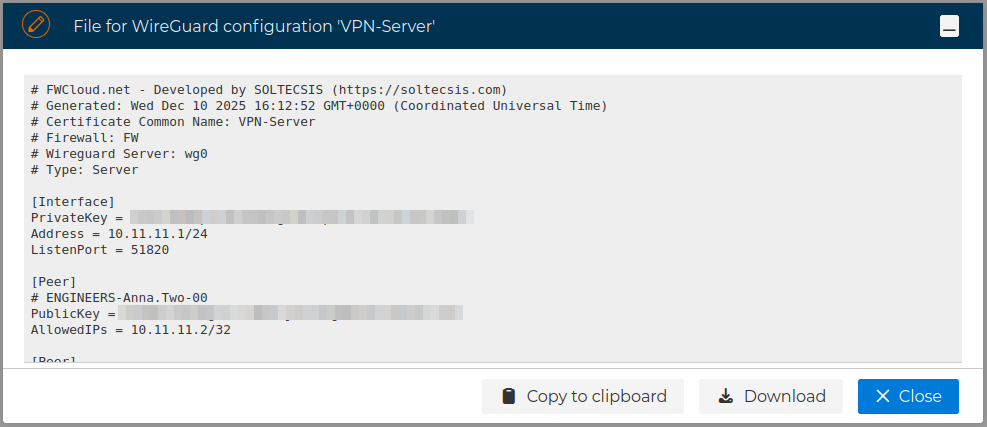
# Server Config File
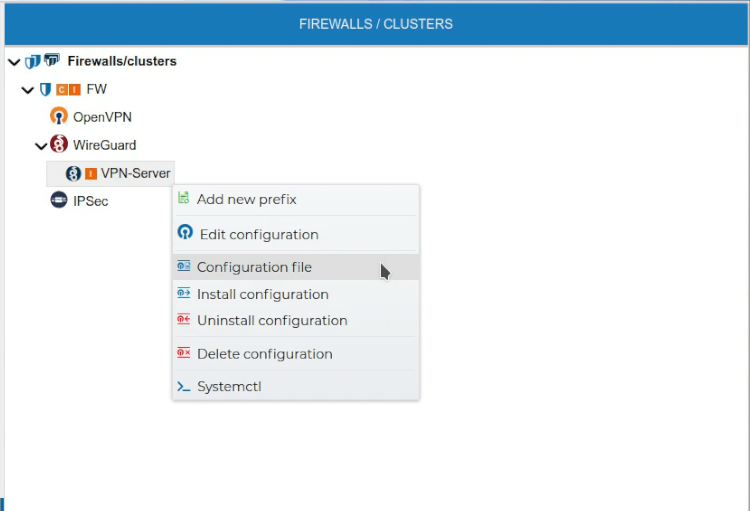
Although the VPN server configuration can be installed on the firewall from the FWCloud-UI, also you can get access to the file that stores this configuration, just right click and select Configuration file.
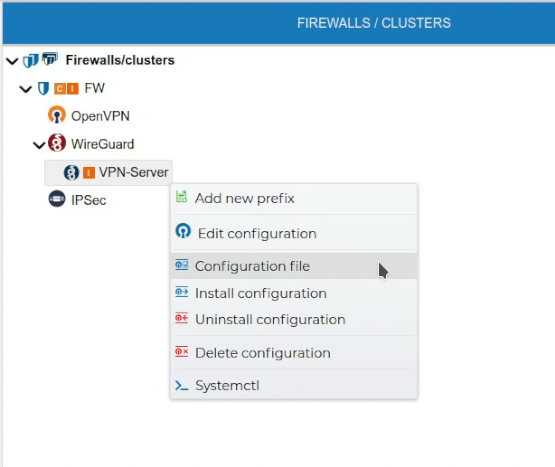
A new form is opened where you can download or copy the content of the file to the clipboard.
# Clients Config File
The configuration file of the VPN clients can also be obtained by right clicking on the client configuration name and select Configuration file.
A new form is opened where you can download or copy the content of the file to the clipboard.
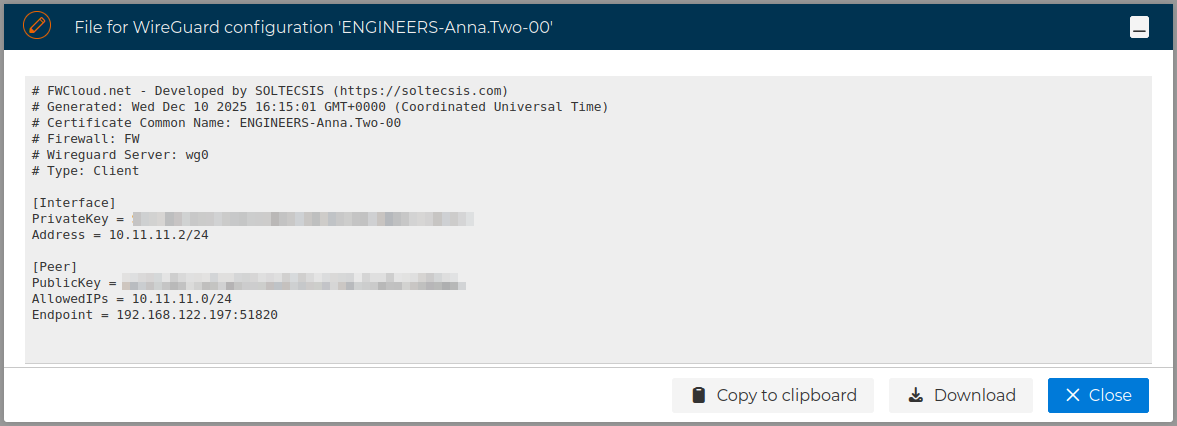
If you copy it to the clipboard a popup message in the right top corner will indicate when the copy has finished.

This file will be needed if you want to install the a VPN connection in the client equipment.
# Edit Configurations
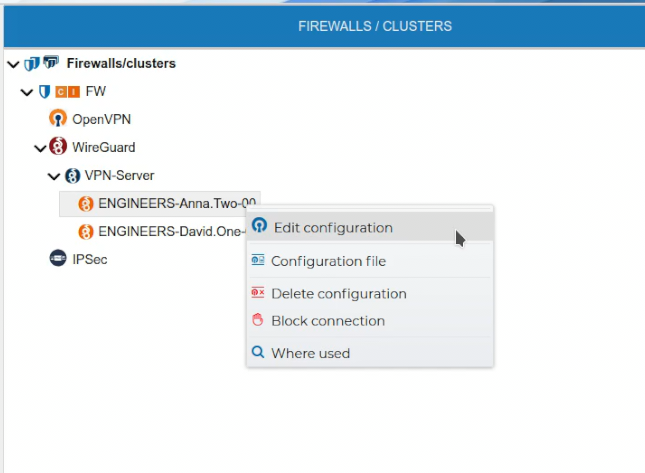
In order to edit the VPN server configuration right click on the VPN server name and select Edit configuration.
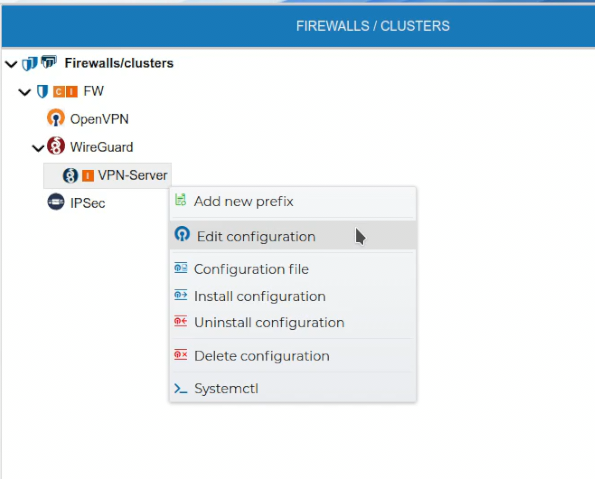
The configuration form for the server is opened and you can make any notifications to it.
Also the VPN configuration of a client can be edited if you right click on the client configuration name and select Edit configuration.
The configuration form for the client is opened.
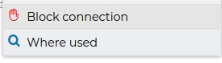
# Block / Unblock Client Configurations
When a VPN connection is not going to be used for a temporal period it can be blocked, not allowing the connection to be established
The process will install the new server configuration to start to blocking the connection. If the password of the the firewall is not stored it will be required.
A message informs the connection has been successfully blocked:

Now the server configuration has the peer configuration commented out:

VPN connections blocked are displayed in gray text and the icons change to reflect that.
Any blocked VPN connection can the unblocked from the context menu:
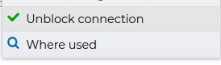
Again the modified server configuration will be installed in the firewall, and a message will inform it has been unblocked.
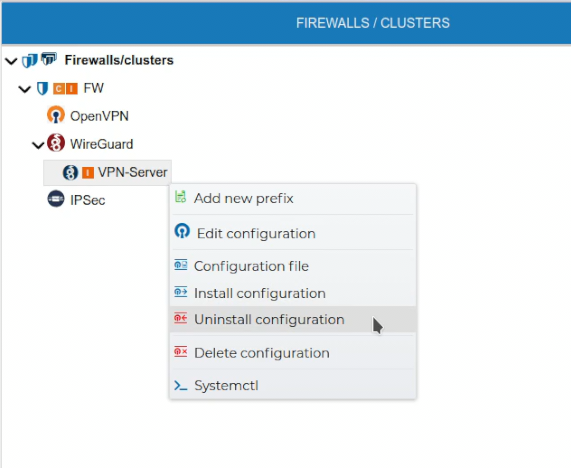
# Uninstall Configurations
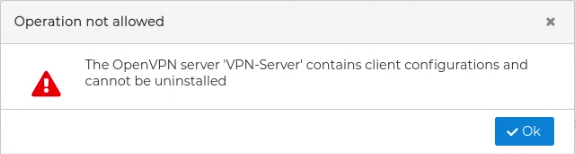
The VPN server configuration can be uninstalled from the firewall. All client configuration of the VPN server must be uninstalled first.
FWCloud will check if there are client configurations for the server configuration. In that case it will not proceed and will show an error message.
XXXXXX
# Delete Configurations
If a VPN configuration is no longer needed it can be removed. This can be done from the context menu of the configuration name. Right click and select Delete configuration.
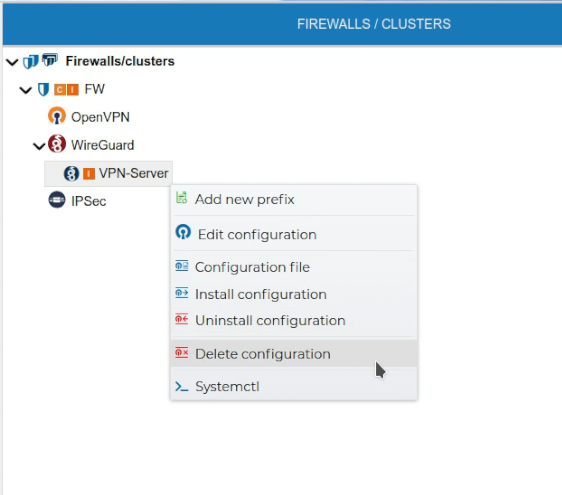
A server configuration can only be deleted if there are no client configurations. FWCloud will detect if client configurations exist.

To delete a client configuration select Delete configuration from the client context menu.
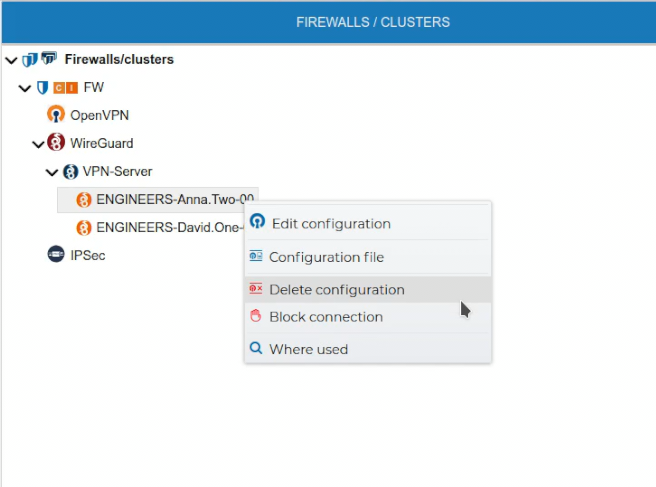
Again FWCloud will check first if there is any conflict that not allows the deletion and it will warn if that is the case.
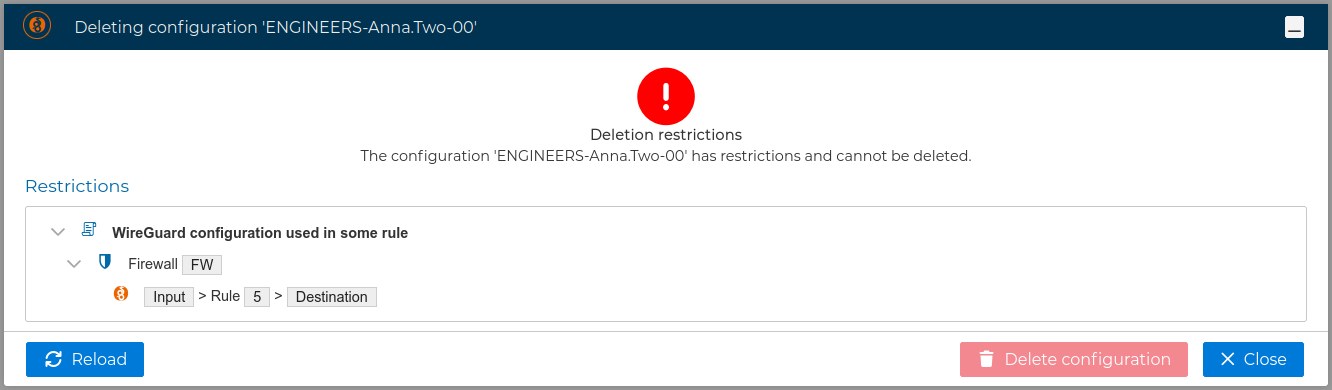
Otherwise you can proceed with client configuration deletion

The server configuration is updated because the peer is removed and needs to be reinstalled, as reflected by the icon.