
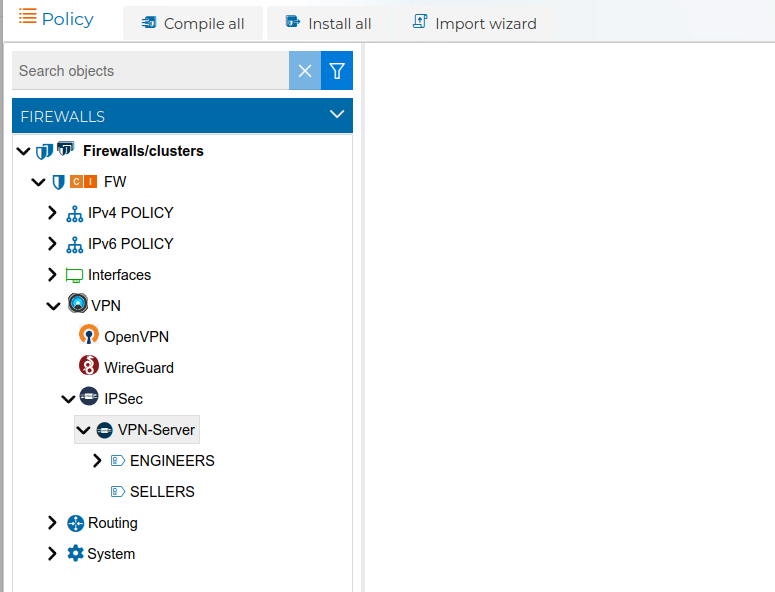
# IPsec
IPsec (Internet Protocol Security) is a suite of protocols used to secure IP communications by authenticating and encrypting each IP packet exchanged between network endpoints. It is commonly used to implement Virtual Private Networks (VPNs), particularly in site-to-site and enterprise network environments.
IPsec operates at the network layer and provides security services such as data confidentiality, integrity, and authentication. It can be used in combination with key management protocols, such as Internet Key Exchange (IKE), to negotiate security associations and cryptographic parameters between peers.
In an IPsec VPN deployment, secure tunnels are established between gateways or hosts, allowing protected communication over untrusted networks. IPsec supports multiple authentication methods, including pre-shared keys and certificate-based authentication using Public Key Infrastructure (PKI).
Due to its flexibility, standards-based design, and widespread support across networking devices and operating systems, IPsec remains a widely adopted technology for secure VPN connectivity.
FWCloud provides a centralized environment for the deployment and administration of IPsec-based VPN connections.
Terminology Note: Server / Client vs. IPsec Roles
For consistency with the previous sections of this documentation, we will continue using the terms server and client when describing IPsec-based VPN scenarios.
It is important to note that these terms are not technically correct in the context of IPsec.
IPsec does not follow a true client/server model. Instead, both endpoints are considered peers, and their roles are defined dynamically during the Internet Key Exchange (IKE) process:
Initiator: the peer that initiates the IKE negotiation
Responder: the peer that responds to the negotiation
Either endpoint can act as an initiator or responder depending on which side brings up the tunnel. There is no permanent hierarchical relationship as implied by the terms server and client.
In practice, however, many IPsec deployments, especially road-warrior or remote-access VPNs, behave similarly to a client/server architecture:
A central VPN gateway with a static public IP
Multiple remote endpoints connecting to it
For this reason, and to maintain conceptual continuity with earlier VPN examples, this documentation will use:
Server to refer to the IPsec gateway (typically the IKE responder)
Client to refer to the remote endpoint (typically the IKE initiator)
These terms are used purely for readability and consistency, and should not be interpreted as reflecting the actual IPsec protocol architecture.
# Server Configuration
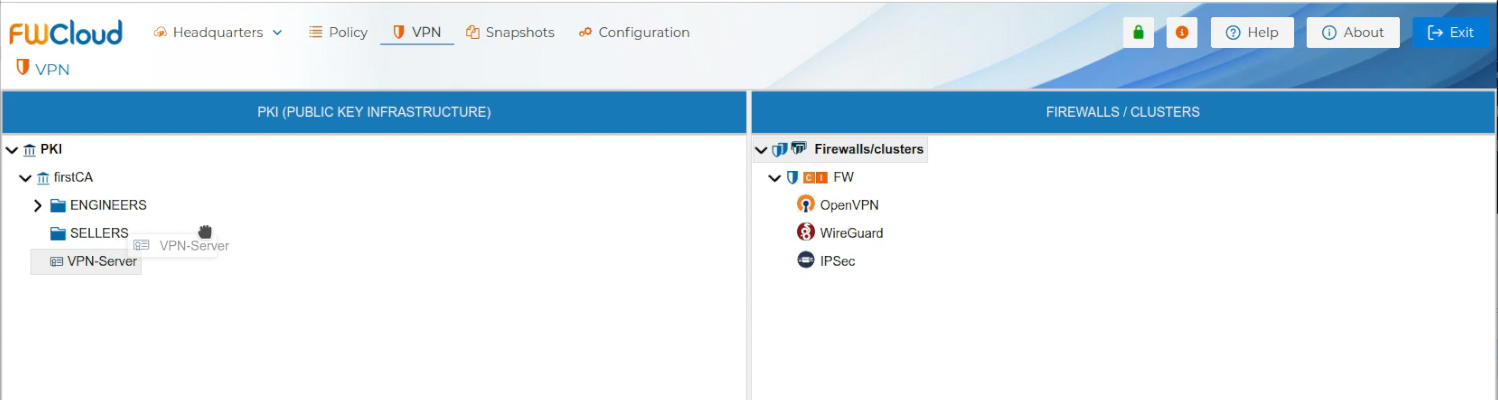
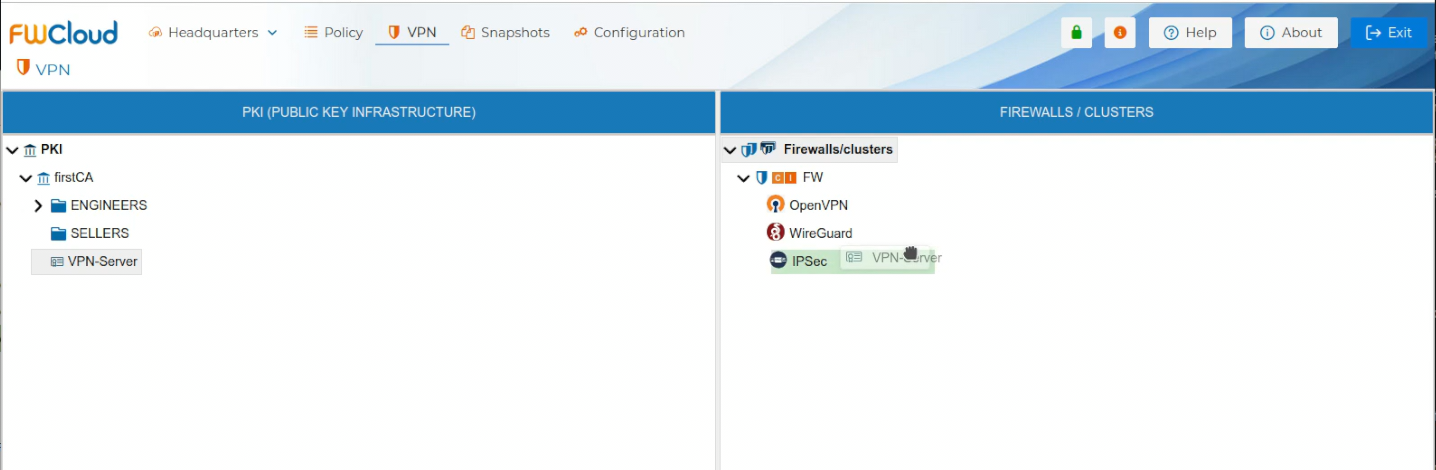
To use the server certificate drag it and drop it over the name of the firewall that is going to be the VPN server or one of the peers of the VPN connection.
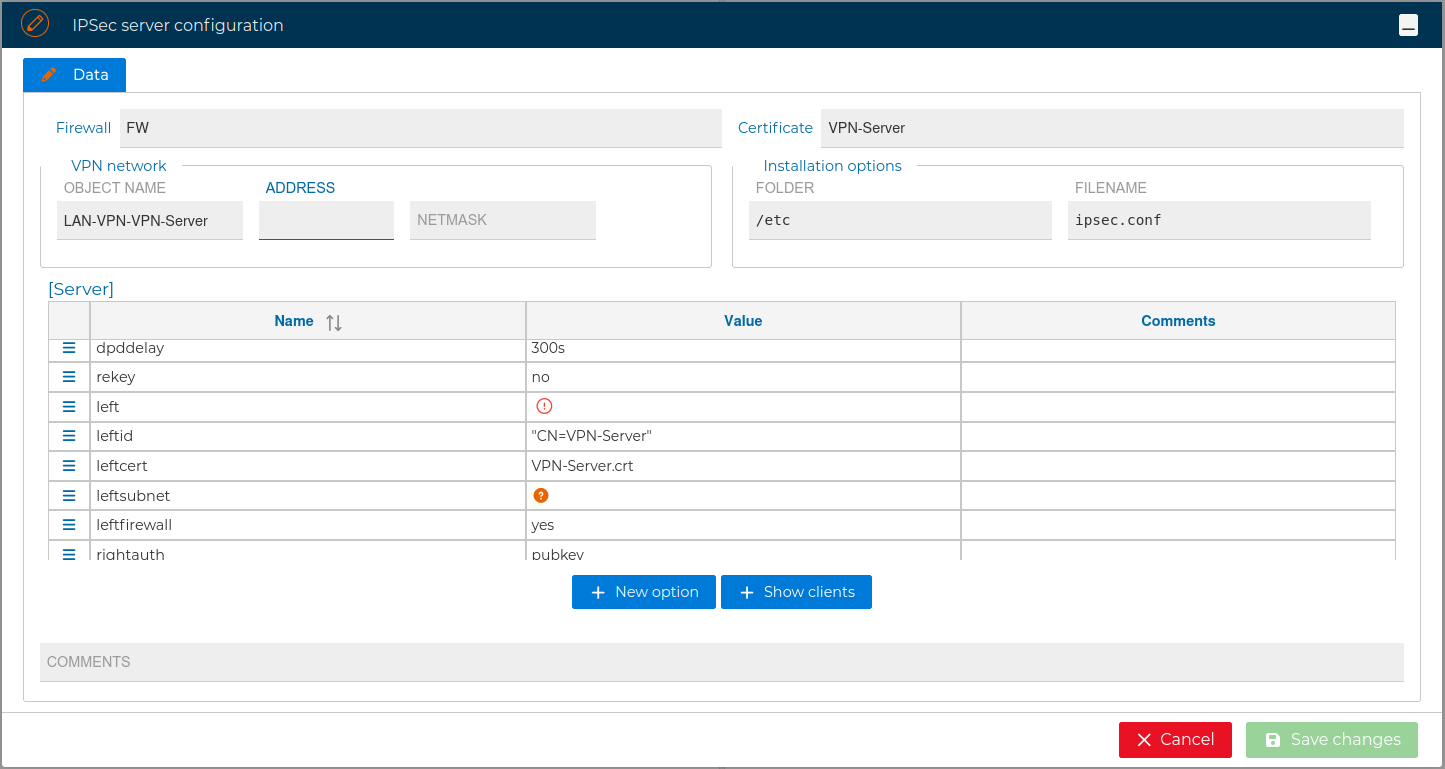
A dedicated panel is provided to configure the server parameters. Users can modify the values of these parameters according to their requirements, remove unnecessary entries, or add new ones. Certain parameters are mandatory and cannot be deleted; FWCloud enforces these restrictions to ensure proper VPN functionality.
You need write down the network and the mask of the VPN network. FWCloud will create an object named LAN-VPN-xxxx, where xxxx is the common name of the Sever Certificate, it can be modified. FWCloud will use this network for the value of the IPsec attribute "leftsubnet" and the first IP address of this network for the attribute "left".
A road-warrior VPN scenario is designed to provide secure remote access for individual clients, such as users or devices, that connect from varying and often unknown IP addresses. In this model, the VPN server typically has a fixed IP address, while clients connect from dynamic networks. Each client is authenticated individually and is usually assigned a unique virtual IP address by the server from its internal subnet. In this case address from LAN-VPN-xxx are given to "rightsourceip" attribute.
Road-warrior VPNs focus on secure access for mobile or remote clients. The following is an example of the generated ipsec.conf file:
# FWCloud.net - Developed by SOLTECSIS (https://soltecsis.com)
# Generated: Tue Dec 16 2025 14:13:18 GMT+0000 (Coordinated Universal Time)
# Certificate Common Name: VPN-Server
# Firewall: FW
# IPsec Server: ipsec
# Type: Server

config setup
 charondebug="ike 1, knl 1, cfg 0"

conn %default
 type = tunnel
 keyexchange = ikev2
 ike = aes256-sha256-modp2048!
 esp = aes256-sha256!
 dpdaction = clear
 dpddelay = 300s
 rekey = no

 left = 192.168.1.1
 leftid = "CN=VPN-Server"
 leftcert = VPN-Server.crt
 leftsubnet = 10.13.13.0/24
 leftfirewall = yes

 rightauth = pubkey
 auto = ignore

conn ENGINEERS-Anna
 rightsourceip = 10.13.13.2/32
 rightid = "CN=ENGINEERS-Anna.Two-00"
 auto = add
 right=%any
The following section provides a brief description of commonly used parameters in this file:
- left – Defines the server’s network endpoint.
Value: The server’s private IP or hostname (e.g., 192.168.1.1). The value of the parameter must correspond to the peer’s real network IP address. It must not be set to a virtual or inner IP address assigned to one of the tunnel endpoints, because it is used during the initial IKE negotiation to establish the VPN tunnel. At this stage, the virtual or inner IP addresses have not yet been assigned and are not reachable.
- leftid – Specifies the server identity used in the VPN.
Value: Can be an IP address, FQDN, or Distinguished Name from the server certificate.
- leftcert – References the server certificate file.
Value: Path to the certificate file (e.g., /etc/ipsec.d/certs/serverCert.crt).
- leftsubnet - Specifies the server-side subnet or subnets that are accessible through the VPN. Defines which internal resources are routed to the VPN clients.
Value: Can be an IP address or network (e.g., 10.200.0.0/24)
- leftauth – Sets the authentication method for the server.
Possible values: psk (pre-shared key), rsasig (RSA signature via certificates) or pubkey (public key).
- leftfirewall – Controls automatic firewall rules for the server.
Possible values: yes (enables automatic iptables rules), no (manual configuration).
- right – Defines the client endpoint.
Value: Typically %any for Road-Warrior clients, allowing connections from any IP.
- rightid – Specifies the client identity.
Value: IP address, FQDN, or certificate Distinguished Name matching the client certificate.
- rightcert – References the client certificate file (optional for server configuration; primarily used on the client).
Value: Path to the client certificate.
- rightsubnet - Usually set to the client’s local subnet or left empty for single-host clients.
Value: rightsubnet=192.168.0.0/24 or 0.0.0.0/0 if routing all traffic through VPN.
- rightauth – Sets the authentication method for the client.
Possible values: psk, rsasig or pubkey.
- rightsourceip – Assigns the virtual IP address, or IP range for clients.
Value: Subnet from which the server dynamically allocates unique IPs to each client (e.g., 10.13.13.0/24).
In contrast, a Site-to-Site VPN scenario connects two or more fixed networks over a secure tunnel. Each endpoint represents a gateway with a static IP address and defined local subnets. Once the tunnel is established, all devices within each site can communicate with the remote network without requiring individual VPN clients or per-user authentication.
Site-to-Site VPNs are intended for permanent, network-to-network connectivity between fixed locations.
The following example shows the contents of the ipsec.conf file for this scenario:
# FWCloud.net - Developed by SOLTECSIS (https://soltecsis.com)
# Generated: Tue Dec 16 2025 12:11:03 GMT+0100 (Central European Standard Time)
# Certificate Common Name: VPN-Server
# Firewall: FW
# IPsec Server: ipsec
# Type: Server

config setup
 charondebug="ike 1, knl 1, cfg 0"

conn %default
 keyexchange = ikev2
 ike = aes256-sha256-modp2048!
 esp = aes256-sha256!
 dpdaction = clear
 dpddelay = 300s
 rekey = no

 left = 10.1.1.1
 leftsubnet = 10.200.0.0/24
 leftid = "CN=VPN-Server"
 leftcert = VPN-Server.crt
 leftfirewall = yes
 rightauth = pubkey
 auto = ignore

conn ENGINEERS-Anna
 right = ███.███.███.███
 rightsubnet = 192.168.0.0/24
 rightid = "CN=ENGINEERS-Anna-Two-00"
 auto = start
Note:
In this example the right side is behind NAT and its real public IP address has been intentionally hidden
Although the configuration in this form is enough for the VPN Sever configuration you can modify these settings and modify, add or delete the allowed options, like the name of the file that will store this configuration or its folder or other options like leftid.
For reference, next are the allowed options: keyexchange, ike, esp, dpdaction, dpddelay, rekey, left, leftid, leftcert, leftsubnet, leftfirewall, rightauth, auto, charondebug, right, rightsubnet. More information about the options can be found in strongSwan Docs (opens new window)
All parameters can also be modified later on if you double click the name of the Sever Certificate on the right panel of VPN section or if you right click and select Edit configuration.
# Install Sever Configuration
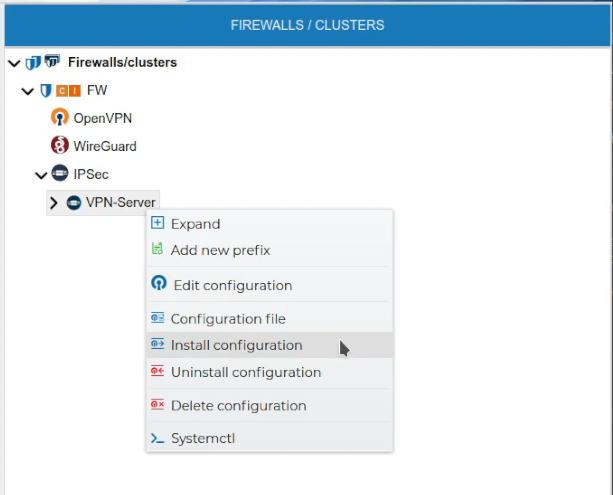
Once the VPN Server configuration is created, it needs to be installed in the firewall. Right click over the server certificate and select Install Configuration.
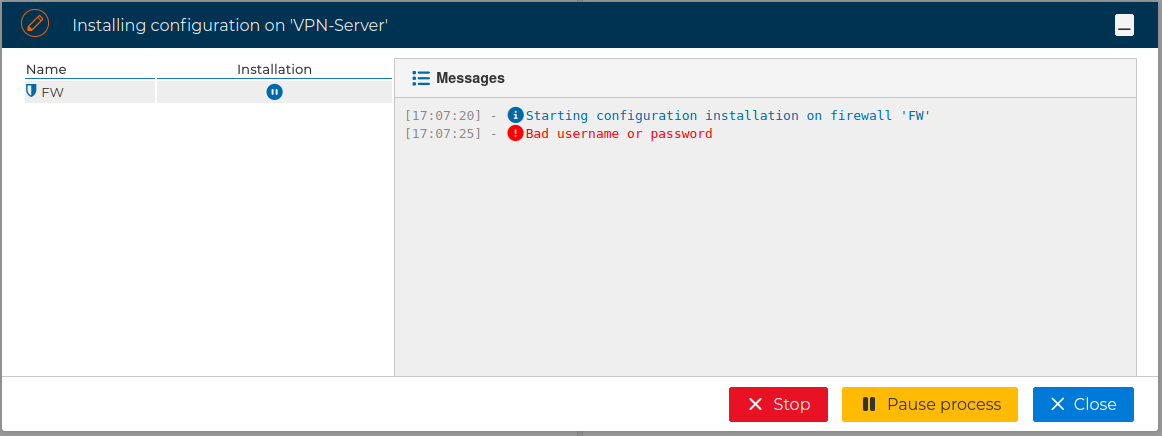
If FWCloud access the target firewall via SSH and the credentials are not configured a pop up windows will ask for them, otherwise the installation will proceed.
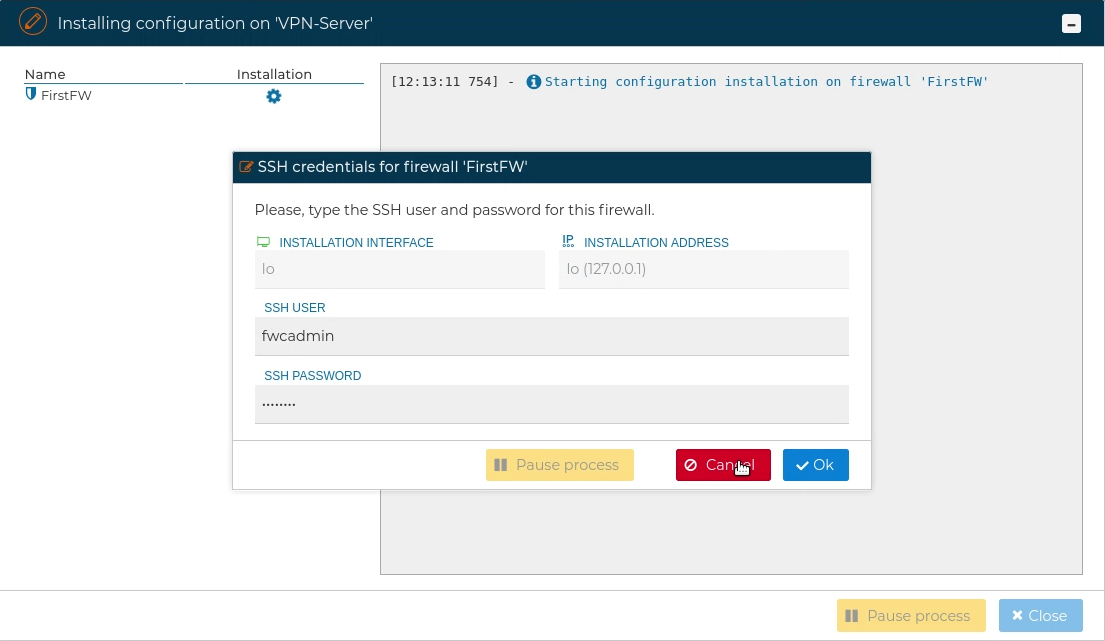
When using SSH access, the user provided also needs to be able to execute "sudo" commands, otherwise the next error will occur:
If no problems occur the VPN Server configuration will be installed on the target firewall
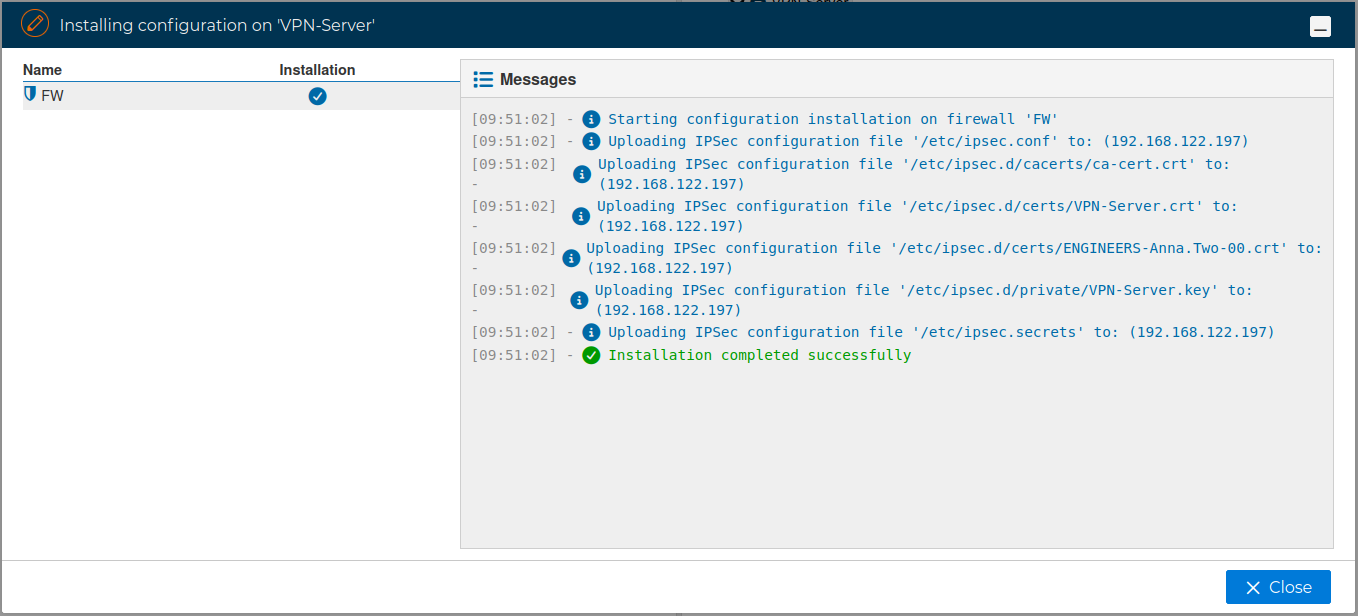
The installation process generates the configuration files /etc/ipsec.conf and /etc/ipsec.secrets, and deploys the required PKI infrastructure, including the certificates, on the target firewall.
# tree /etc/ipsec.d
/etc/ipsec.d
├── aacerts
├── acerts
├── cacerts
│   └── ca.crt
├── certs
│   └── VPN-Server.crt
├── crls
├── ocspcerts
├── policies
├── private
│   └── VPN-Server.key
└── reqs
# Client Configuration
To use the client certificate drag it and drop it over the name of the VPN server. Note that the VPN server background turns green we you hover the certificate over it.
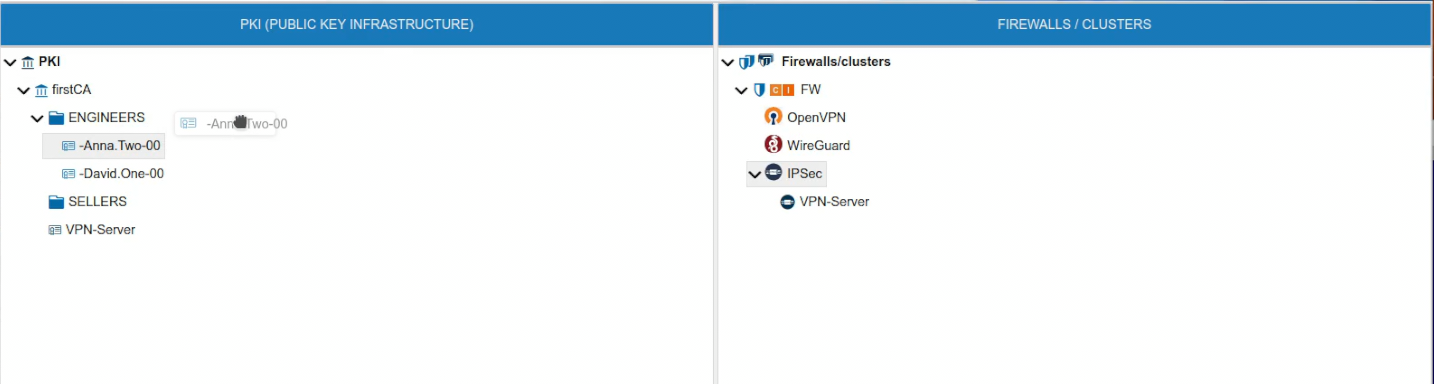
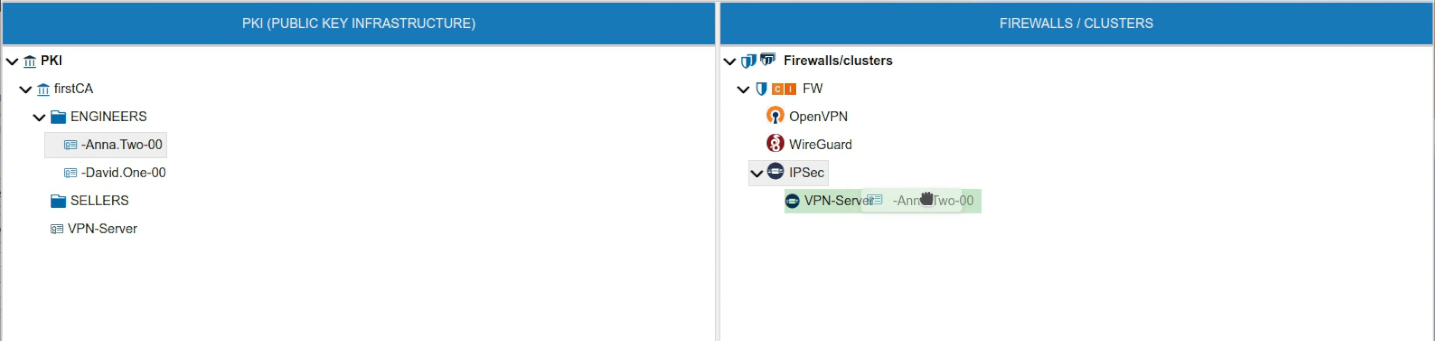
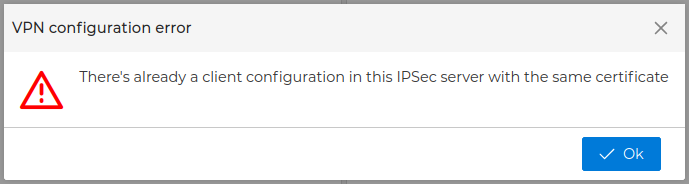
If the VPN server already has another certificate with the same name you will receive a warning and the certificate will not be moved to the server. The name of the certificates must be unique within the VPN server scope.
If this the first certificate you drop, automatically a new form is opened where you can configure the IPsec options for the client.
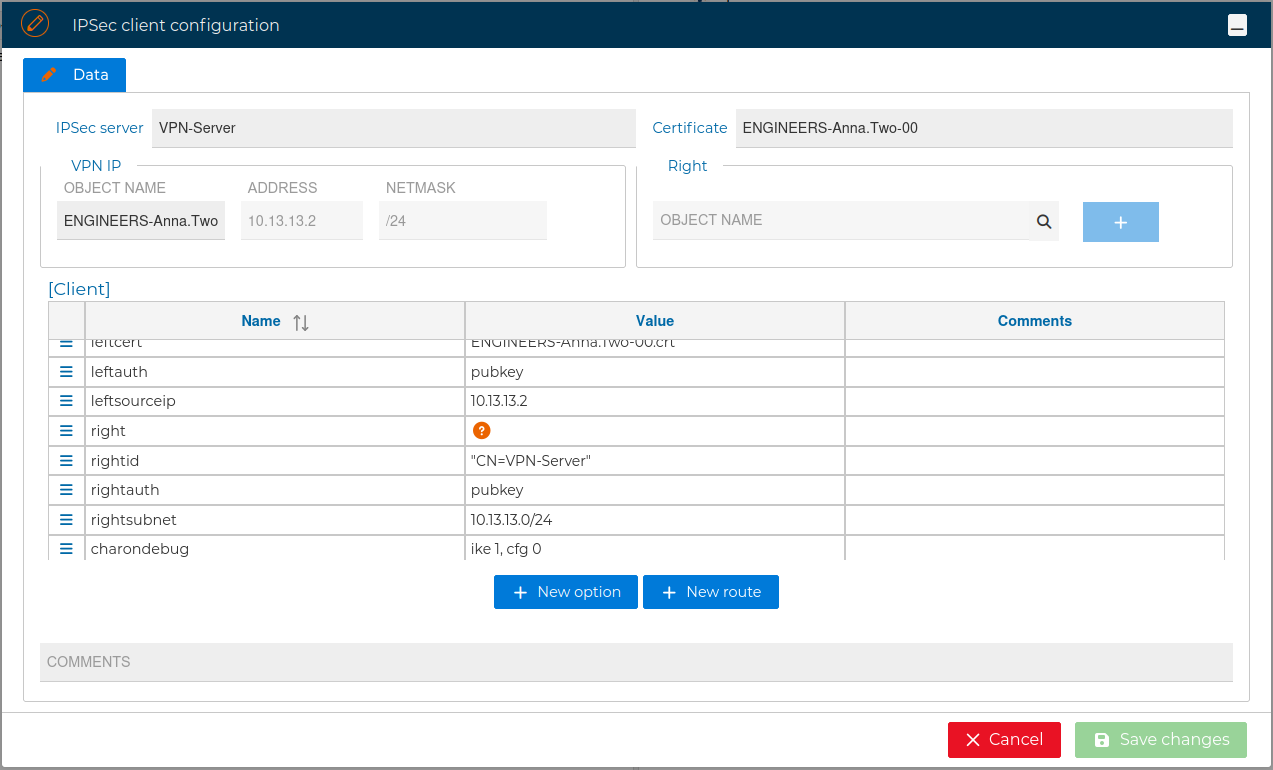
The right attribute is required, you can fill its value directly or using the magnifying glass to look for a FWCloud object:
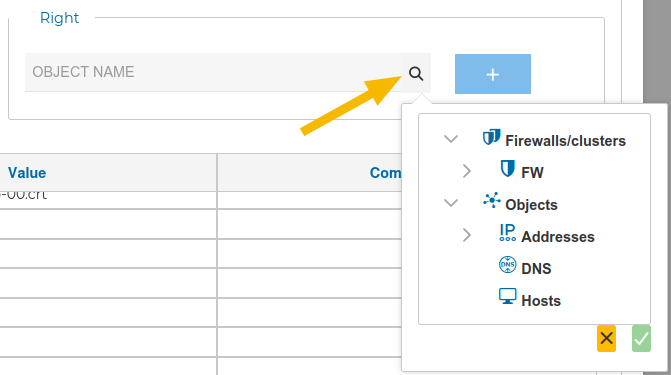
Select the appropriate object and click the  icon, and then click on the
 + icon next to the field.
In the VPN client configuration form you can add, delete or modify options like keyexchange, ike, esp, left, leftid, leftcert,leftauth, leftsourceip, right, rightid, rightauth, rightsubnet, charondebub and auto. More information about this options can be found in strongSwan Docs (opens new window)
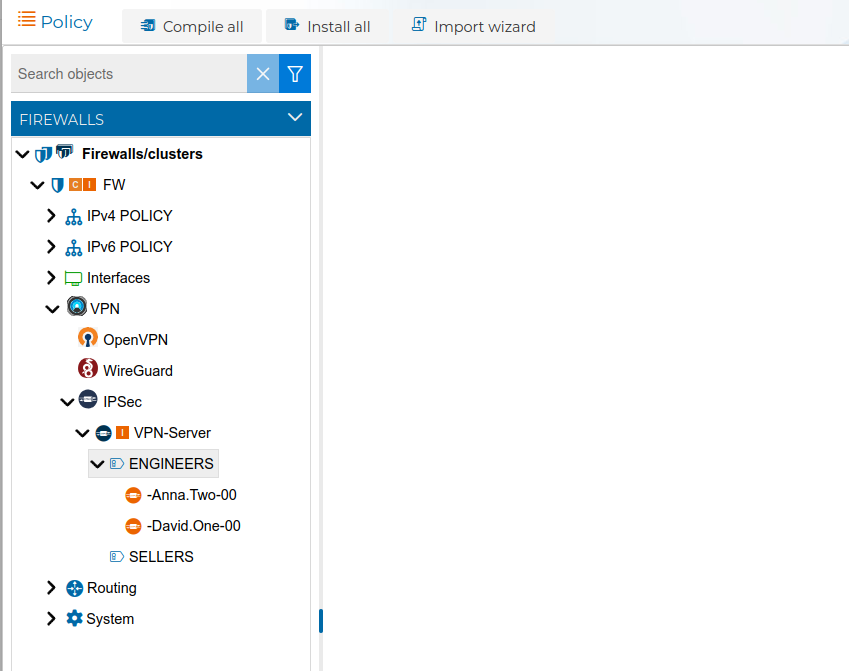
When you have the VPN client configuration ready press Save changes button in right bottom side of the form. The new client certificate appears in the FIREWALLS/CLUSTER side and the server configuration is adapted to include the new peer. The server configurations needs to be installed again in the firewall to reflect these changes, what is indicated by an  icon by the server name.
When you drop the client certificate in the VPN server, if this server already have other client certificates you will be asked if you want to clone the configuration from another VPN client.
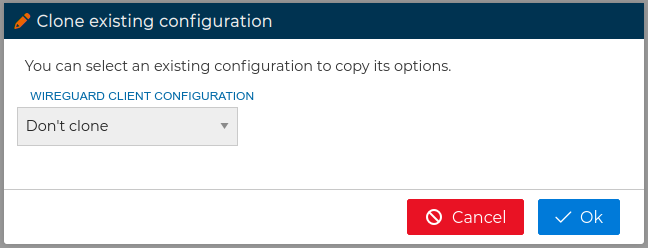
In this form you can choose from the drop down field which client configuration you want to copy its options from. When you are configuring multiple clients this feature save you a lot of time and avoid mistakes. After that the client configuration form will be opened.
# Install Client Configuration
Once the VPN client configuration is created, it is incorporated into the VPN server configuration. For this reason, the server configuration must be installed in the firewall in order for the client settings to take effect
When a server configuration contains pending changes, an icon is displayed next to the server name. To apply the configuration, right-click on the server and select Install Configuration.
After the server configuration has been successfully installed in the firewall, the icon is cleared, indicating that all changes have been applied.
The client configuration file must be installed on the client system or systems, which are not directly accessible from FWCloud. From FWCloud, configuration installation is only supported on the server firewall (or left site). For the remote endpoint, the client configuration file must be downloaded and installed manually.
To download the client configuration file, refer to the Clients Config File section.
In addition, the corresponding client certificates (including both the private key and the public certificate), as well as the Certificate Authority (CA) certificate used to issue those certificates, must also be downloaded and installed on the client systems.
# Standalone Client Configuration (Without Associated Server)
FWCloud can create IPSec client configurations that are not attached to an IPSec server configuration. This is useful when you need to generate client-side configurations for external peers managed outside FWCloud.
To create a standalone client configuration, right click on the IPSec root node and choose one of the available profiles:
Site-to-siteRoad-warriorCustom
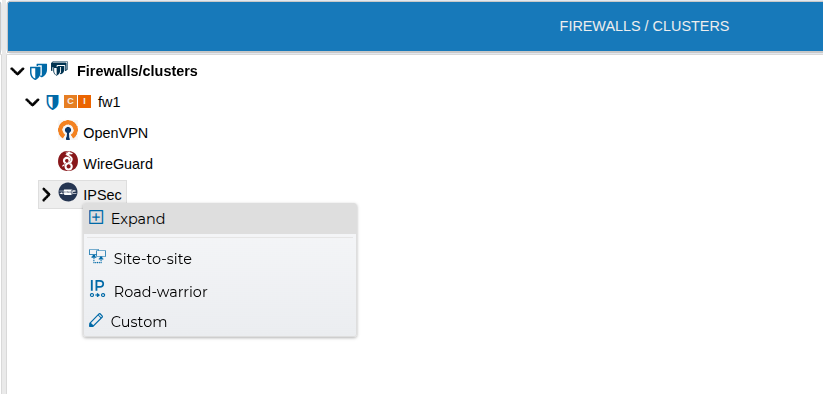
In this workflow, no client certificate is required and the resulting object is created as an independent IPSec client configuration.
Profile behavior:
Site-to-siteandCustomstart withleftsubnetandrightsubnet, using PSK authentication (leftauth=psk,rightauth=psk).
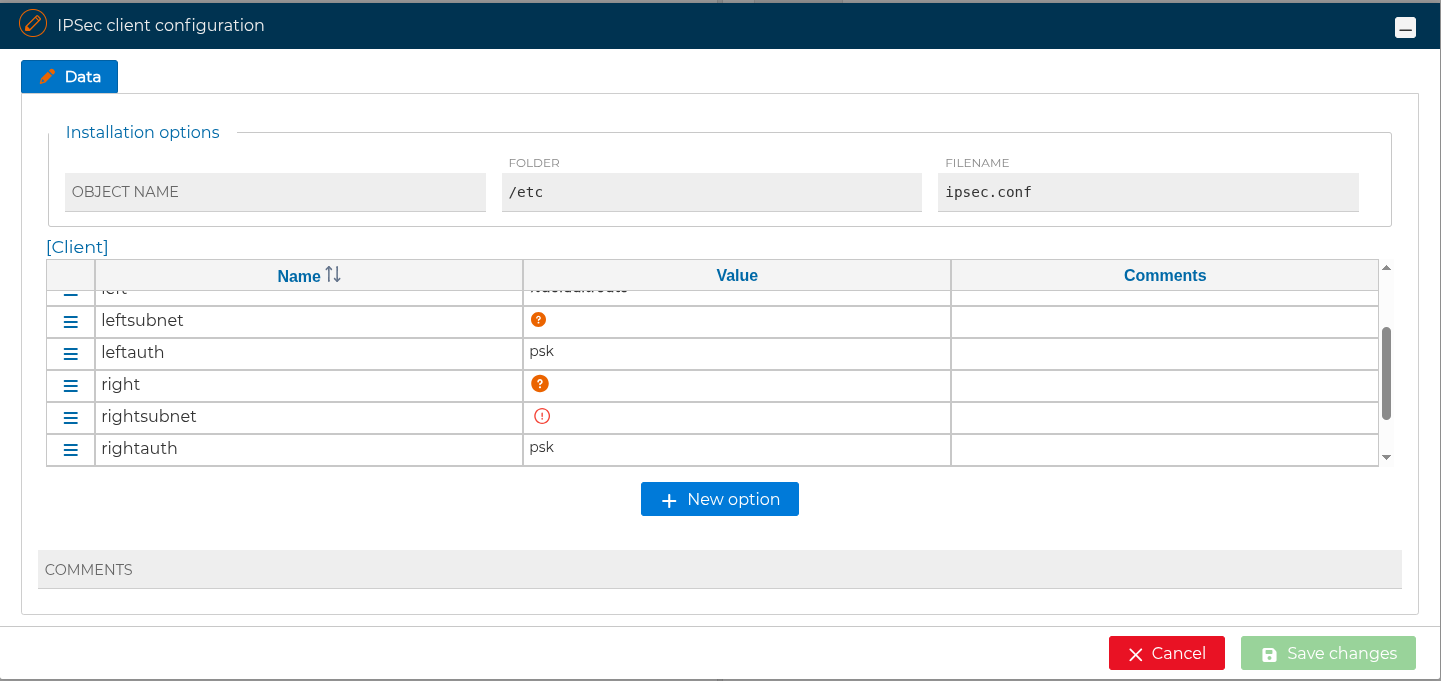
Road-warriorstarts withleftsourceipandrightsubnet, also using PSK authentication.

- In all cases, the
rightoption is mandatory.
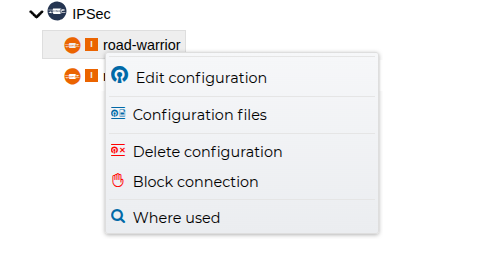
To access the context menu for each client, simply right-click on the item and the panel will appear.
When editing the standalone client, you can still add, remove, or modify IPSec options from the options grid, and set installation parameters (Folder and Filename) for the generated file.
From Configuration file, FWCloud downloads a single .IPSec file. Inside this file, you will find the various “conn” sections for the respective clients. Certificate and key tabs are only available for certificate-based client configurations.
For download details, see Clients Config File .
Policy usage requirement
Standalone IPSec clients without an associated IP object cannot be dropped into policy positions. FWCloud will block the action and show an error.
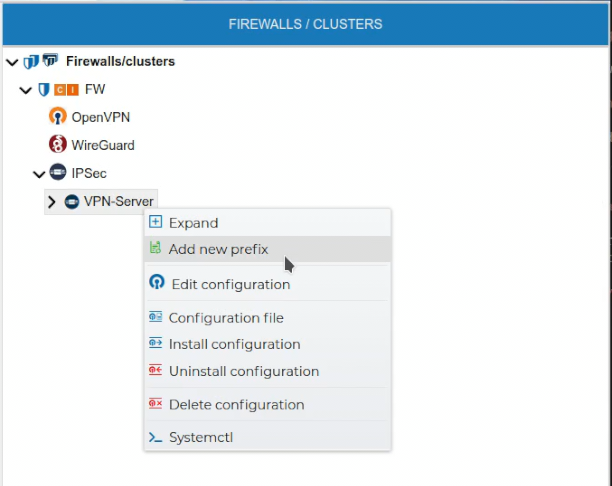
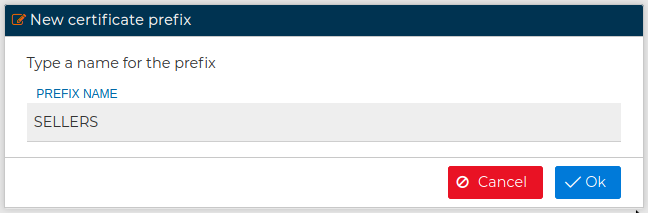
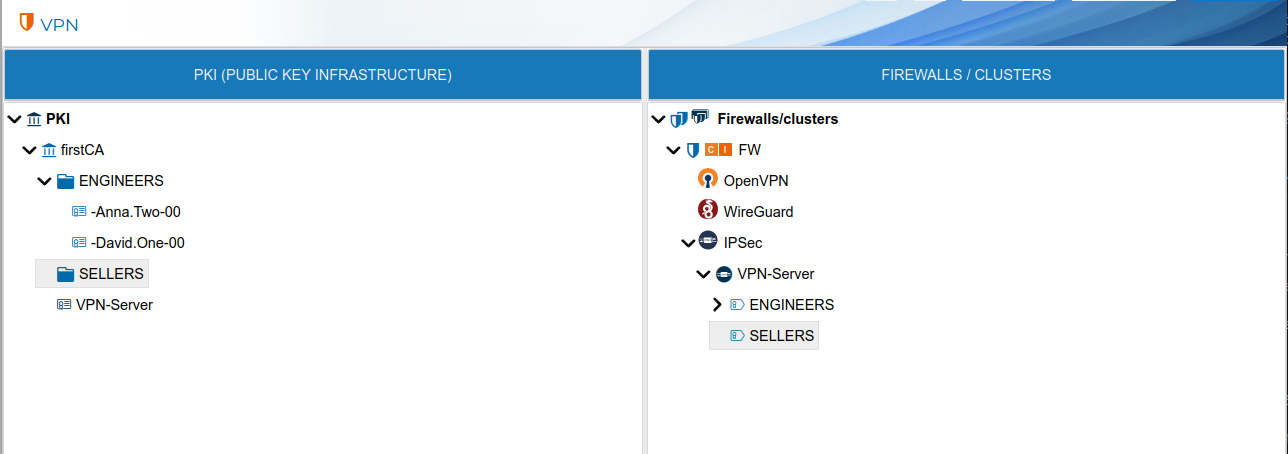
# Prefixes
Prefixes can also be created in the FIREWALL/CLUSTER section.
Do not confuse with PKI prefixes
PKI prefixed are for organizational purposes only while WireGuard server prefixes can be used in the security policy.
In the next figure you can see PKI prefixes on the left side are represented by ![]() while the prefixes created in the WireGuard server have a different
while the prefixes created in the WireGuard server have a different ![]() icon.
icon.
You can use the Prefix when creating the policy rules. Instead of needing to add all IP addresses of every VPN connections of any client which his certificate name starts with a common part (the prefix), you can add that Prefix in the rule. The prefix can be dragged and dropped in the rule fields. Only non empty prefixes can be dropped.

FWCloud-UI will display the prefixes in the Policy section when you expand the WireGuard branch inside the firewalls in the Firewalls group. Only VPN server prefixes will be displayed here.
Here you have an example with two rules using prefixes

In this case since we have two VPN client configurations with the prefix ENGINEERS, the rule number 10 refers to any connections established from this two VPN clients
The use of prefixes makes the security policy more clear and easy to read. Also when you create new VPN client configurations with the same prefix you do not need to modify or create new rules. Although the policy needs to be compiled and installed again, since when it was installed in the firewall it did not yet have the new clients configurations.
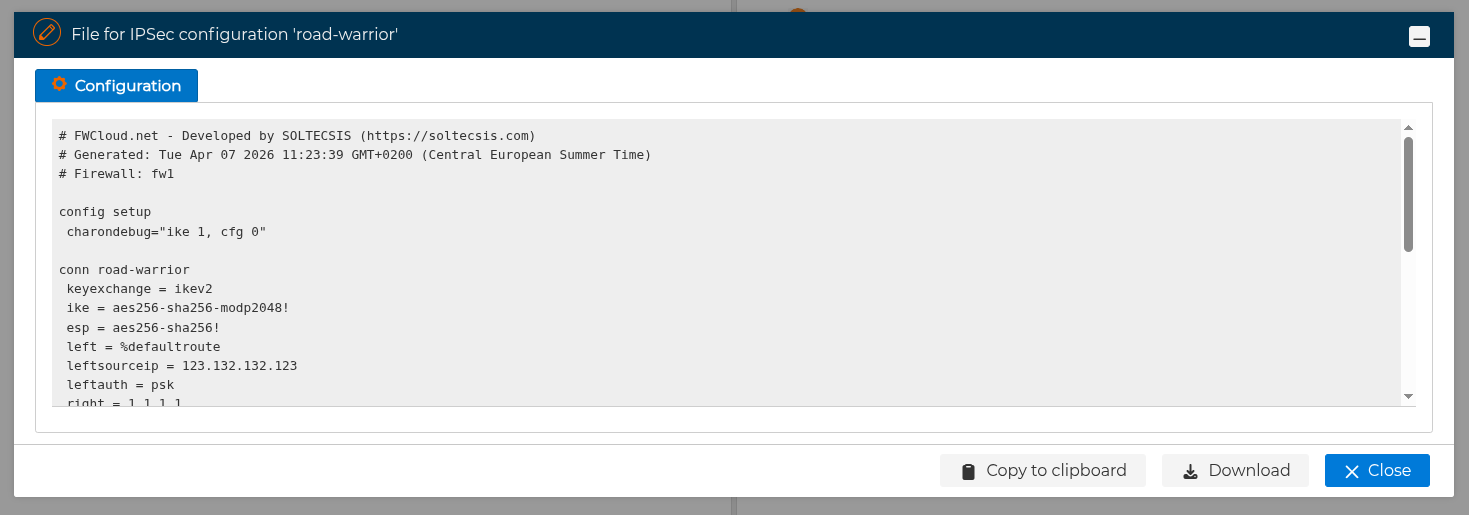
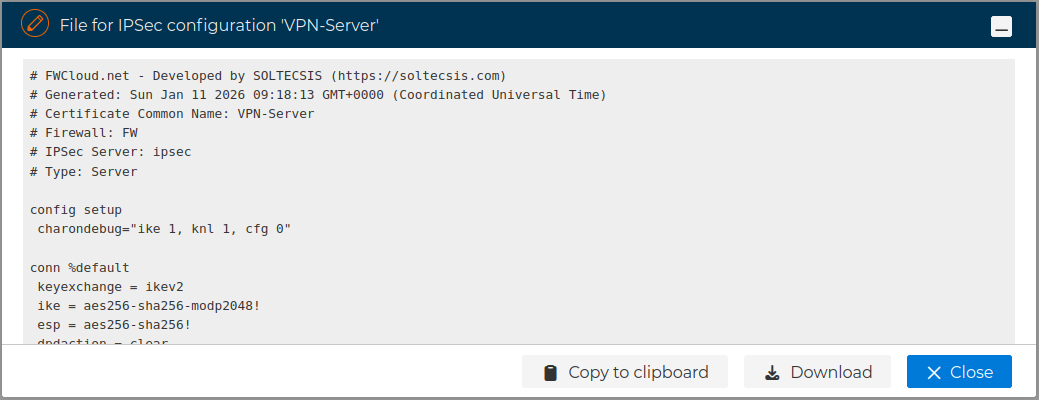
# Server Config File
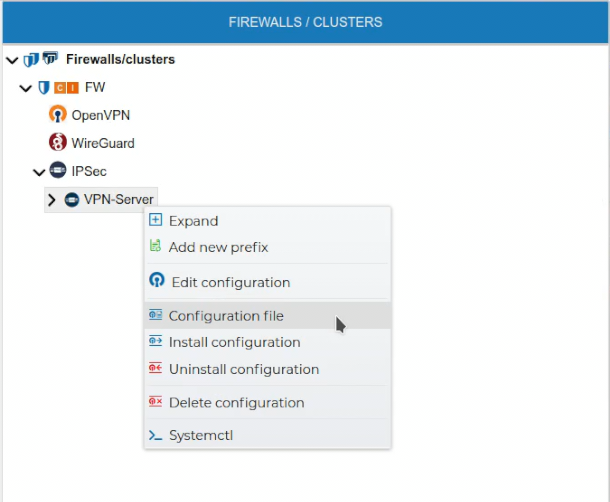
Although the VPN server configuration can be installed on the firewall from the FWCloud-UI, also you can get access to the file that stores this configuration, just right click and select Configuration file.
A new form is opened where you can download or copy the content of the file to the clipboard.
# Clients Config File
The configuration file of the VPN clients can be obtained by right clicking on the client configuration name and select Configuration file.
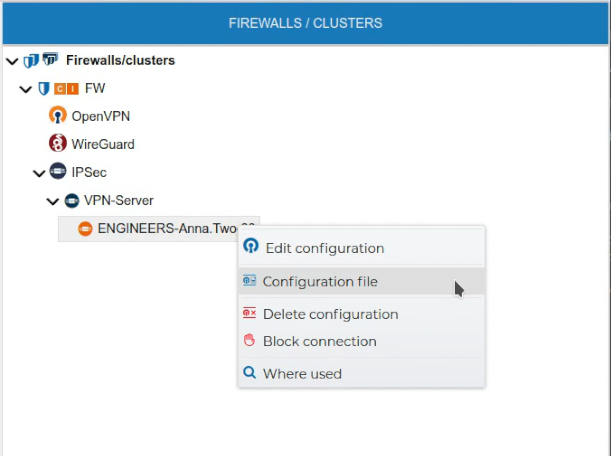
A new form is opened where you can download or copy the content of the file to the clipboard.

If you copy it to the clipboard a popup message in the right top corner will indicate when the copy has finished.

This file will be needed if you want to install the a VPN connection in the client equipment.
# Edit Configurations
In order to edit the VPN server configuration right click on the VPN server name and select Edit configuration.
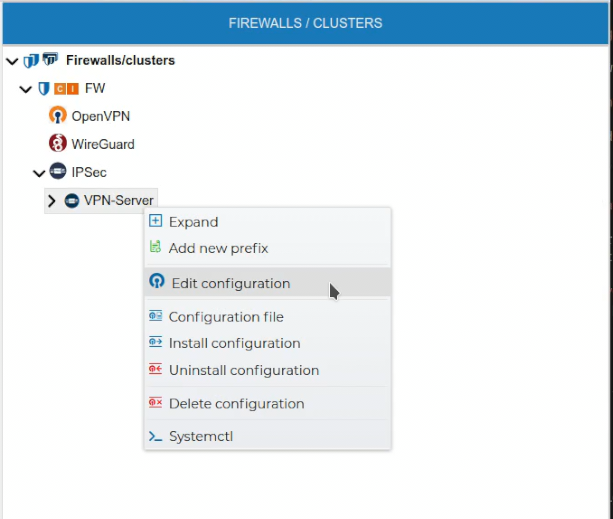
The configuration form for the server is opened and you can make any notifications to it.
Also the VPN configuration of a client can be edited if you right click on the client configuration name and select Edit configuration.
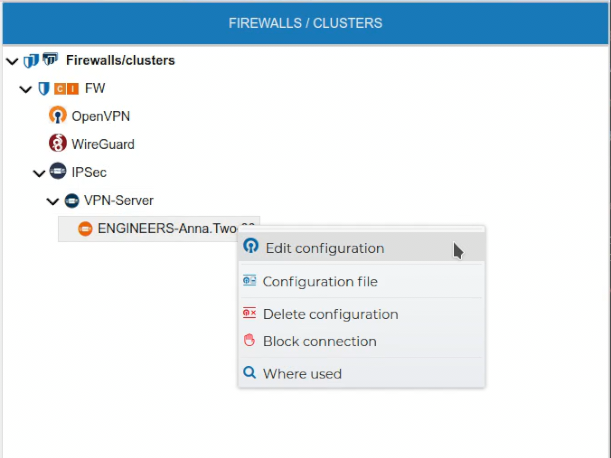
The configuration form for the client is opened.
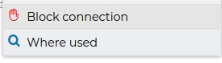
# Block / Unblock Client Configurations
When a VPN connection is not going to be used for a temporal period it can be blocked, not allowing the connection to be established
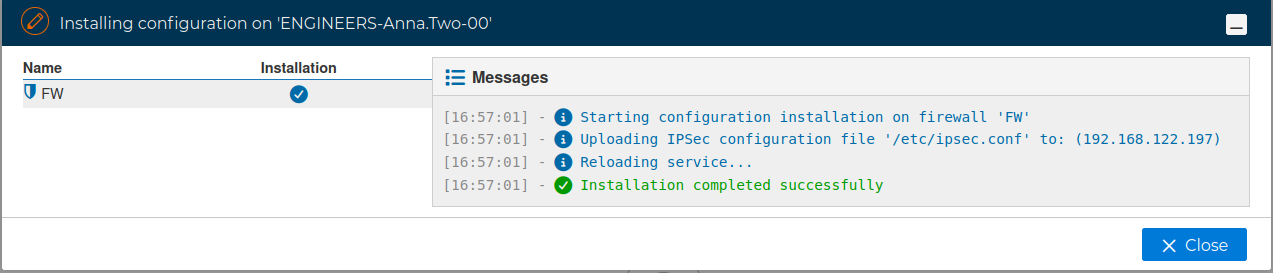
The process will install the new server configuration to start to blocking the connection. If the password of the the firewall is not stored it will be required.
A message informs the connection has been successfully blocked:
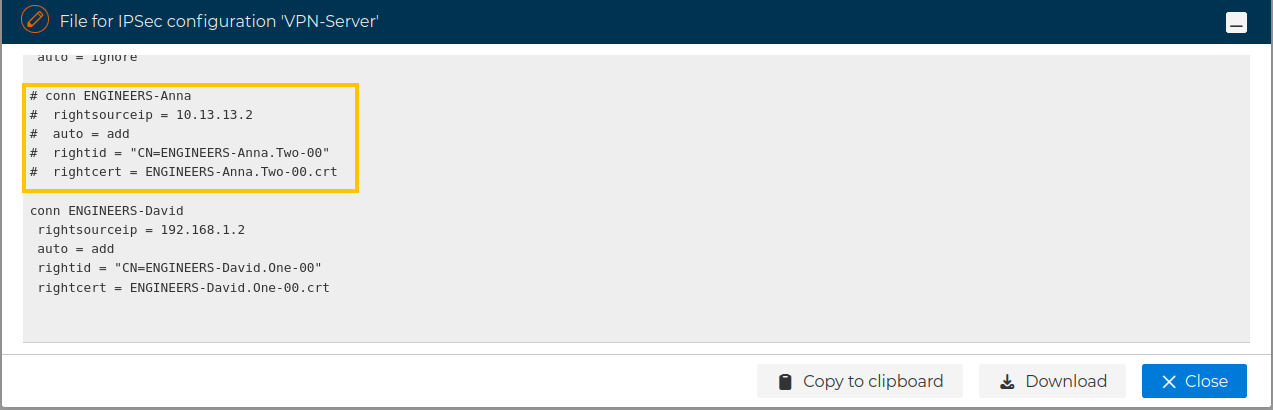
Now the server configuration has the peer configuration commented out:
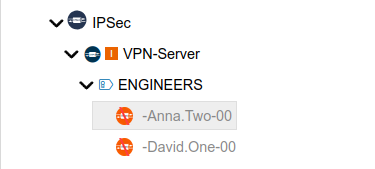
VPN connections blocked are displayed in gray text and the icons change to reflect that.
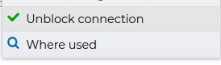
Any blocked VPN connection can the unblocked from the context menu:
Again the modified server configuration will be installed in the firewall, and a message will inform it has been unblocked.
# Uninstall Configurations
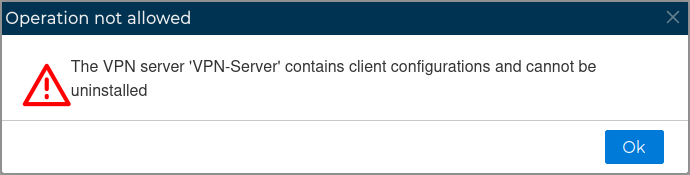
The VPN server configuration can be uninstalled from the firewall. All client configuration of the VPN server must be uninstalled first.
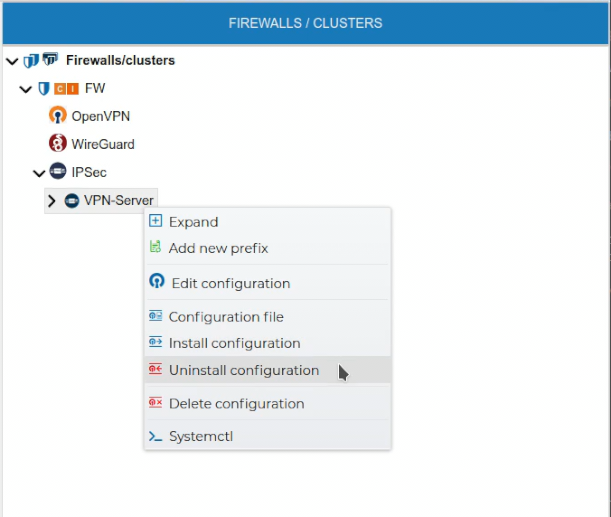
FWCloud will check if there are client configurations for the server configuration. In that case it will not proceed and will show an error message.
# Delete Configurations
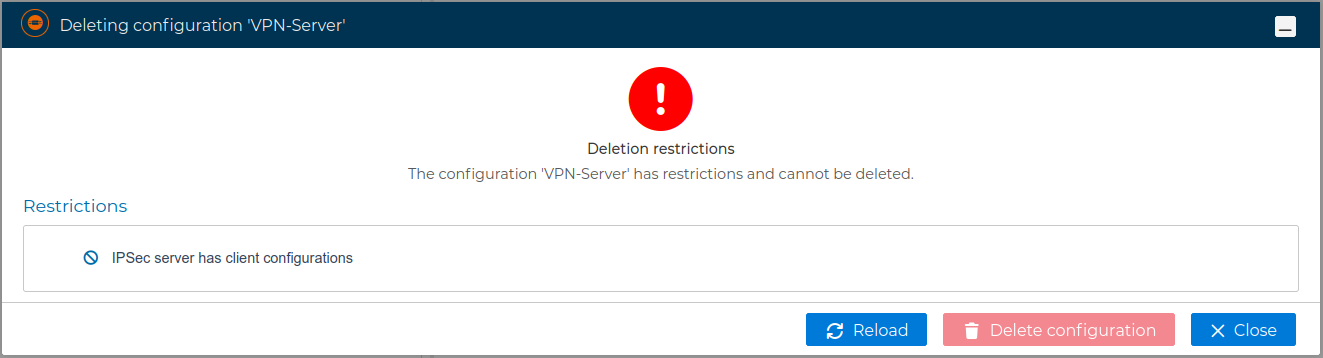
If a VPN configuration is no longer needed it can be removed. This can be done from the context menu of the configuration name. Right click and select Delete configuration.
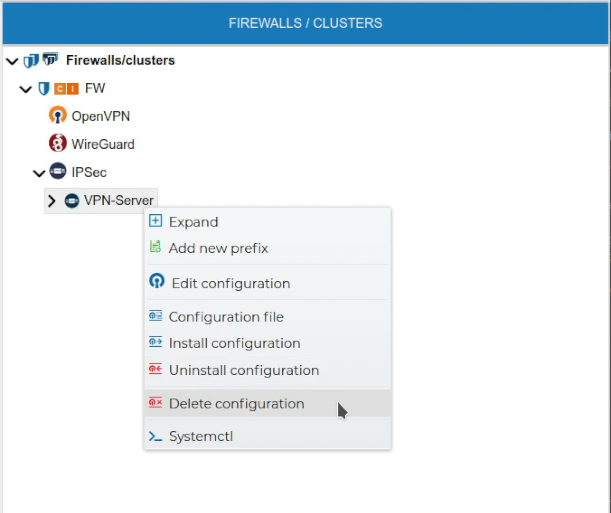
A server configuration can only be deleted if there are no client configurations. FWCloud will detect if client configurations exist.
To delete a client configuration select Delete configuration from the client context menu.
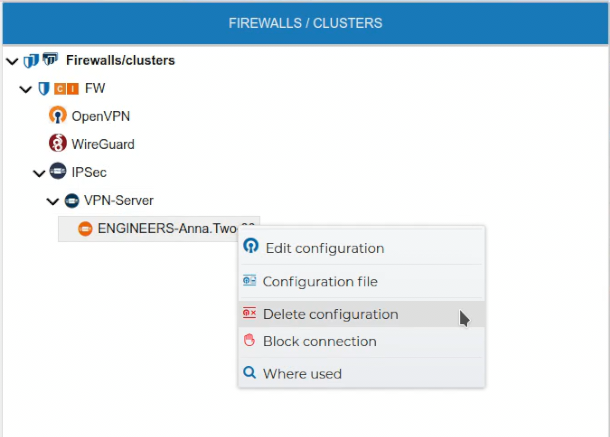
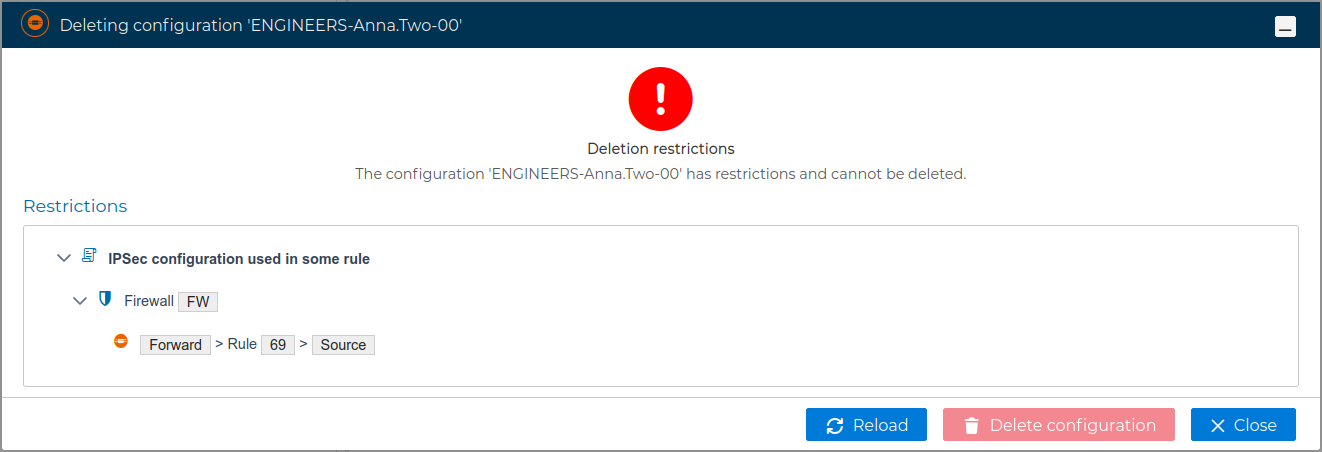
Again FWCloud will check first if there is any conflict that not allows the deletion and it will warn if that is the case.
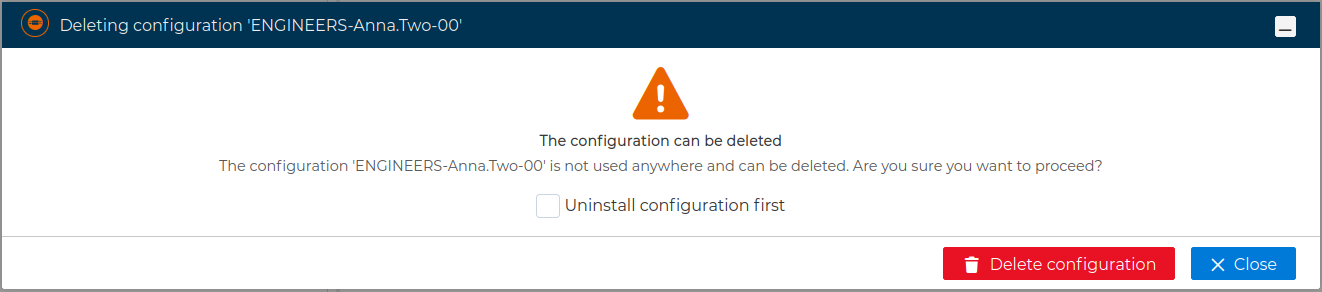
Otherwise you can proceed with client configuration deletion
The server configuration is updated since this peer section is removed from it and needs to be reinstalled, as reflected by the icon.